Introduction
Welcome to the SysInfo Office 365 to PST Export Tool User Manual, your complete guide to securely backing up and managing Exchange Server mailbox data with ease.
In today’s business environment, email data is essential for daily communication and operations. The SysInfo Office 365 Export to PST helps administrators safely back up mailbox data from Exchange Online, on-premises Exchange Server, and hybrid environments. Whether you need to create a secure PST backup, archive mailbox data, support employee offboarding, or prepare data for migration, this tool helps maintain data integrity throughout the process. With its simple interface, advanced filters, broad mailbox support, live progress tracking, and detailed reports, the software makes Exchange Server backup and export tasks easier and more efficient.
Exclusive Features of Office 365 to PST Export Tool
The tool runs on localhost to process data directly on your system. This helps avoid synchronization errors and keeps the migration or backup process more stable and secure.
Step 01: Download SysInfo Exchange Server to PST Export Tool
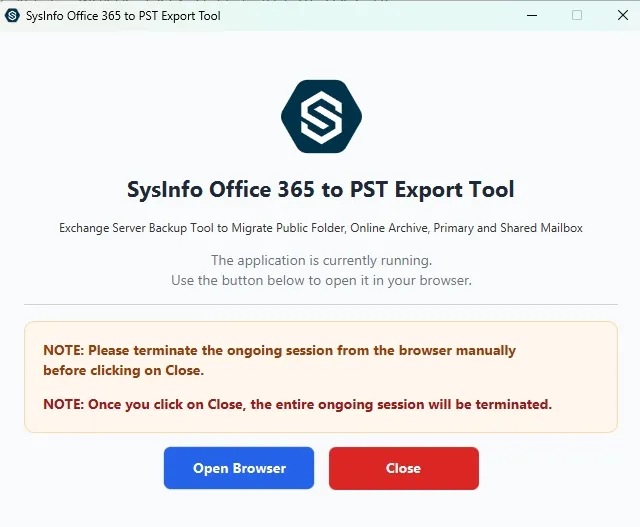
Download and install the software on your Windows system. Launch the application and click Open Browser to begin the backup process.
Step 02: Select Office 365 as the Source
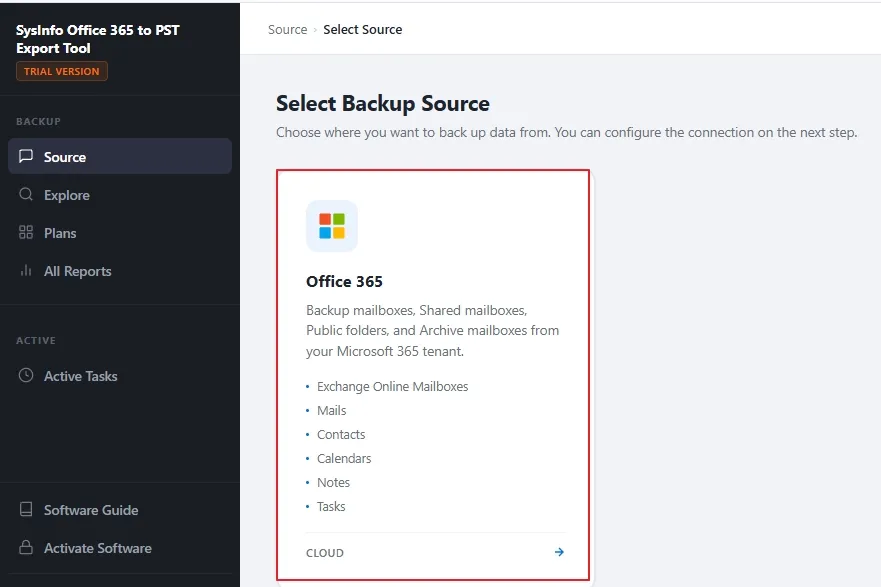
From the source selection screen, choose Office 365 as the source account.
Step 03: Authenticate the Office 365 Source Account
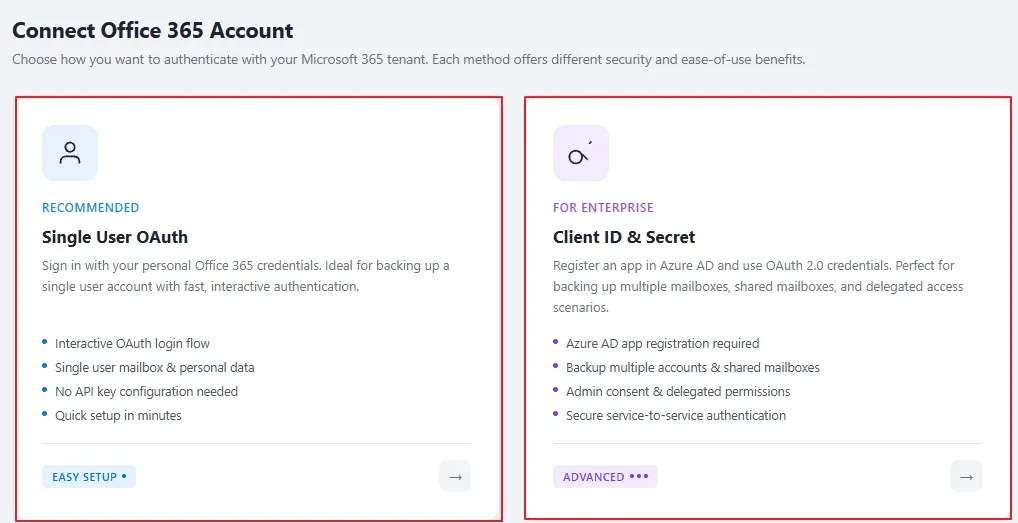
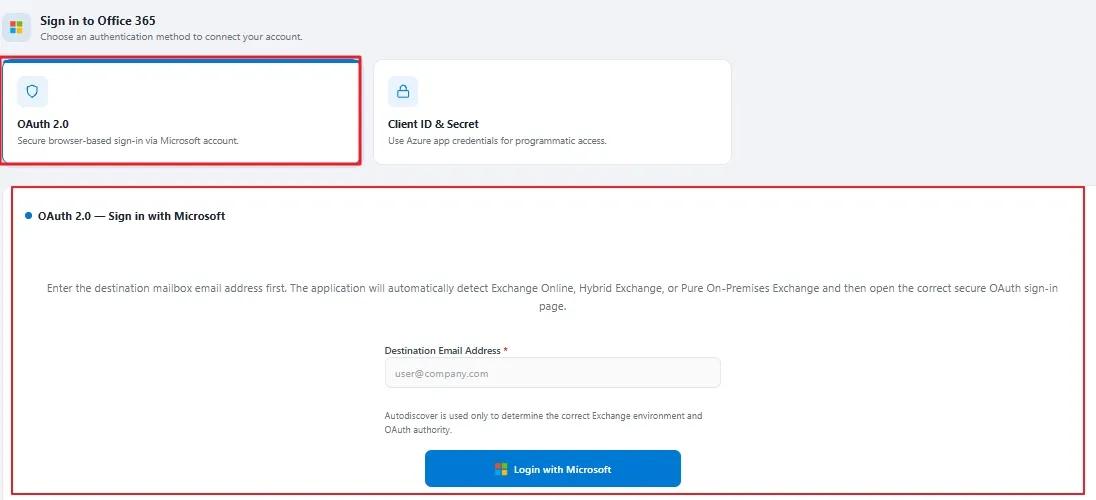
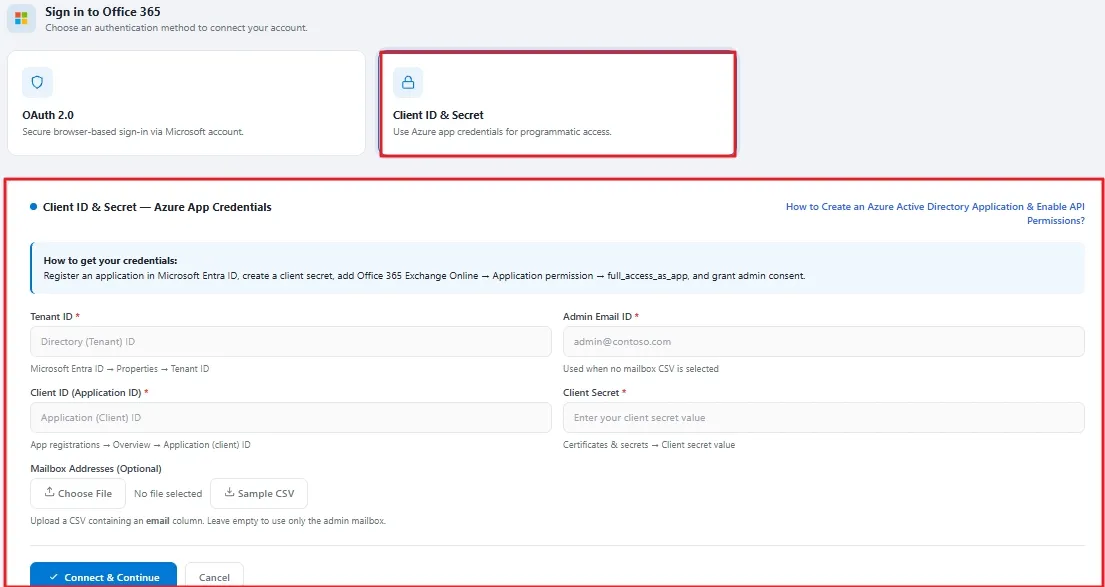
The tool provides two authentication methods. Choose the method that matches your Microsoft 365 setup.
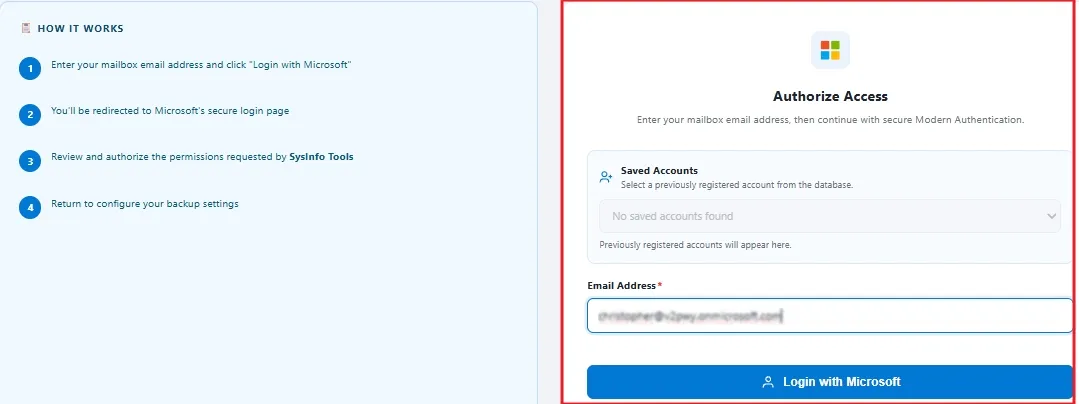
Step 04: Log In Using Single-User OAuth
Note: Before selecting the Microsoft 365 account in the browser, make sure you are already signed in to the required account. If multiple Microsoft 365 accounts are open in different browser windows, use the browser window where the required Microsoft account is already signed in. Authentication proceeds through that browser session.
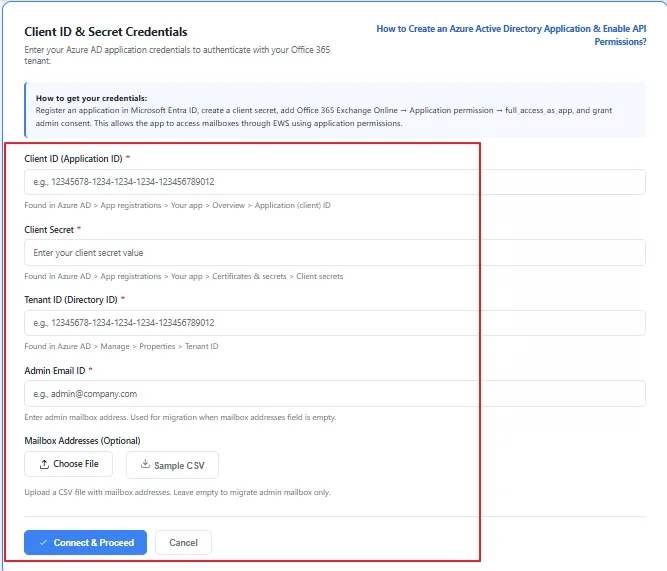
Step 05: Using Client ID & Secret ID
Note: Check the complete instruction: How to Create an Azure Active Directory Application & Enable API Permissions?
Step 06: Select Mailbox Data
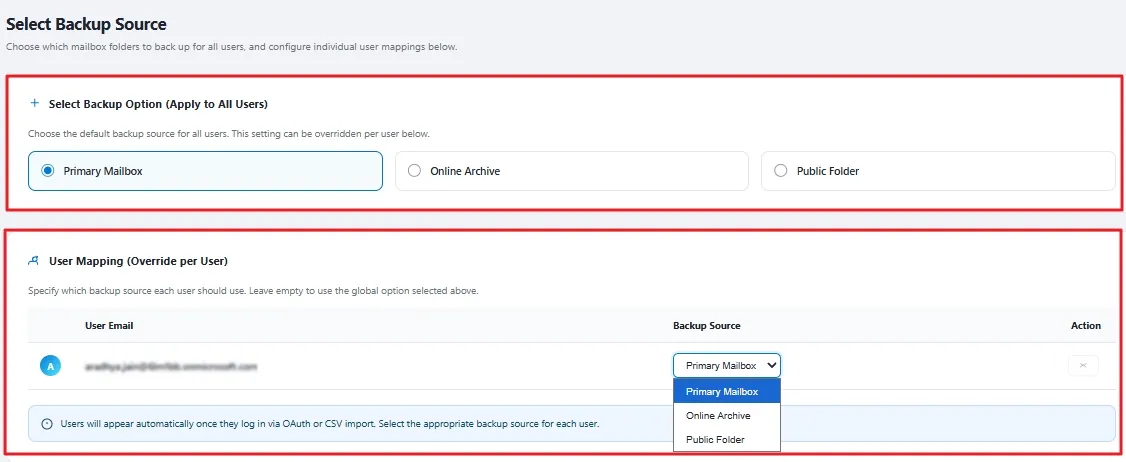
Choose the mailbox data you want to back up from the available options: Primary Mailbox, Online Archive, Public Folder, or Shared Mailbox (Available with Client ID & Secret Authentication).
Note: You can change the selected mailbox type later using the user mapping options.
Step 07: Select Mailbox Folders
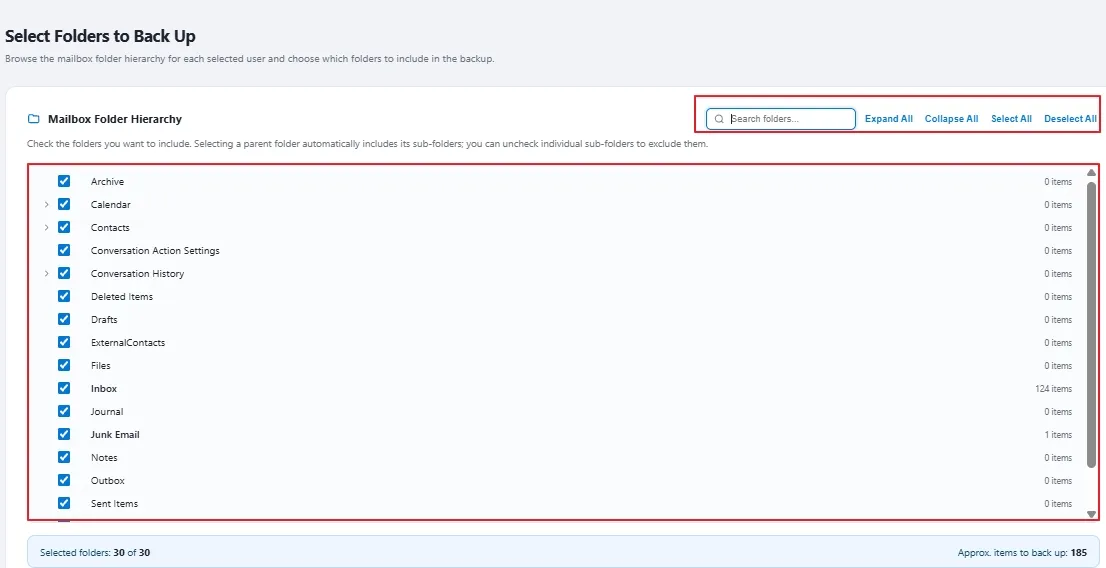
Choose the folders and subfolders that you want to include in the backup. The tool provides several options to make folder selection easier:
Steps to Backup Office 365 to Office 365
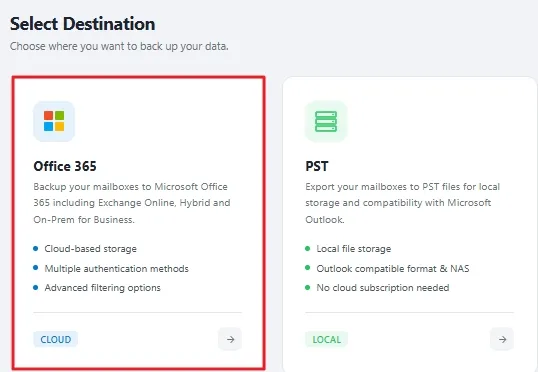
Step 08: Select Office 365 as the Destination
After selecting the source data, choose Office 365 as the destination format.
Step 09: Authenticate the Destination Office 365 Account
Authenticate the destination Microsoft 365 account using either OAuth 2.0 or Client ID & Secret authentication.
Note: Make sure the required Microsoft 365 account is already signed in to the browser before selecting it during authentication.
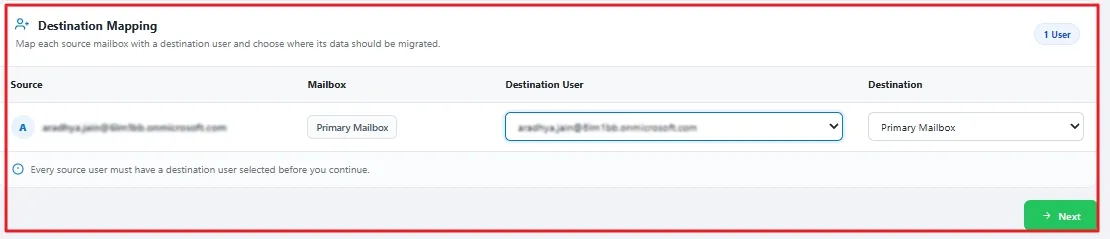
Step 10: Map Source and Destination Mailboxes
Map each source mailbox to the appropriate destination user. The tool supports flexible mapping options, including many-to-many and Many-to-One. Select the destination account and specify where the source mailbox data should be migrated.
Step 11: Configure Advanced Migration Filters
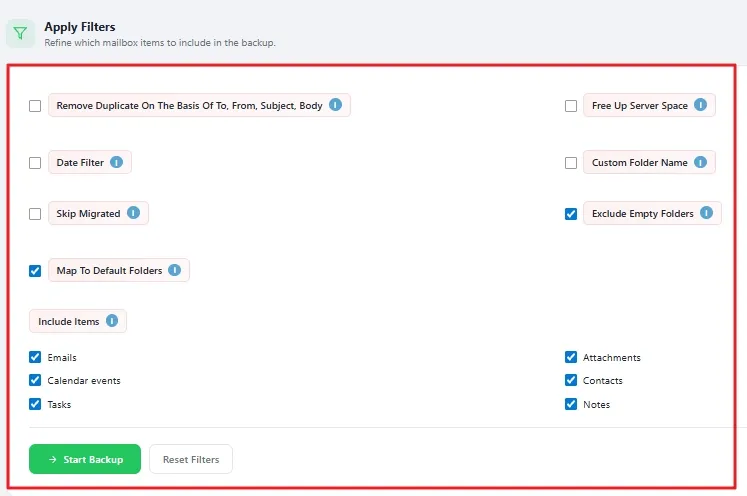
Use the available filters to control how the mailbox data is backed up.
Click Reset Filters to clear the filters and restore their default settings. After configuring the required options, click Start Backup.
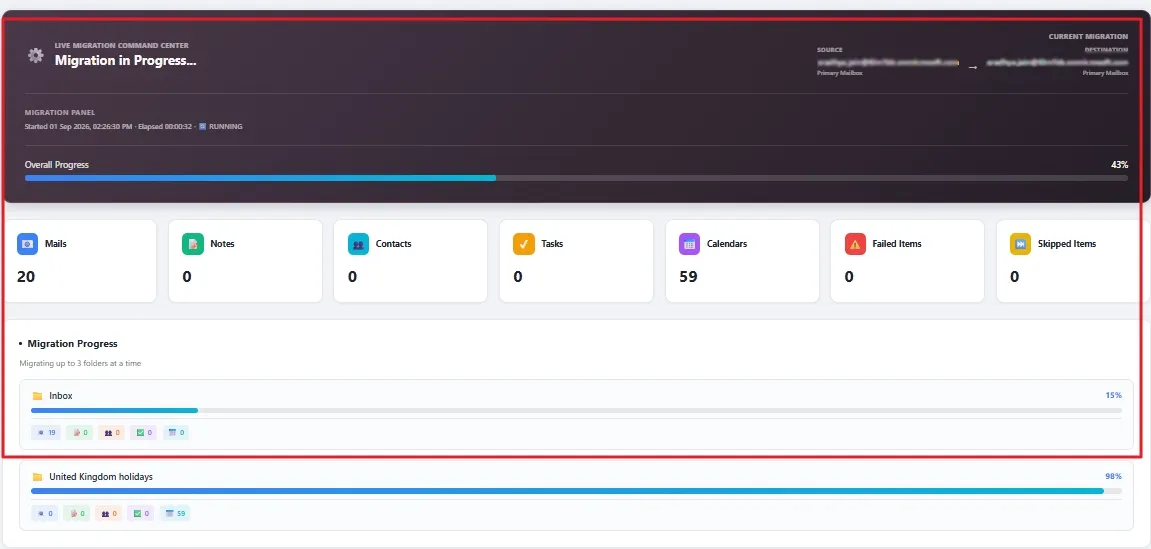
Step 12: Monitor the Office 365 to Office 365 Backup
You can monitor the process and review transfer statistics in real time as the mailbox data is copied to the destination Microsoft 365 account.
Step 13: View Backup Reports
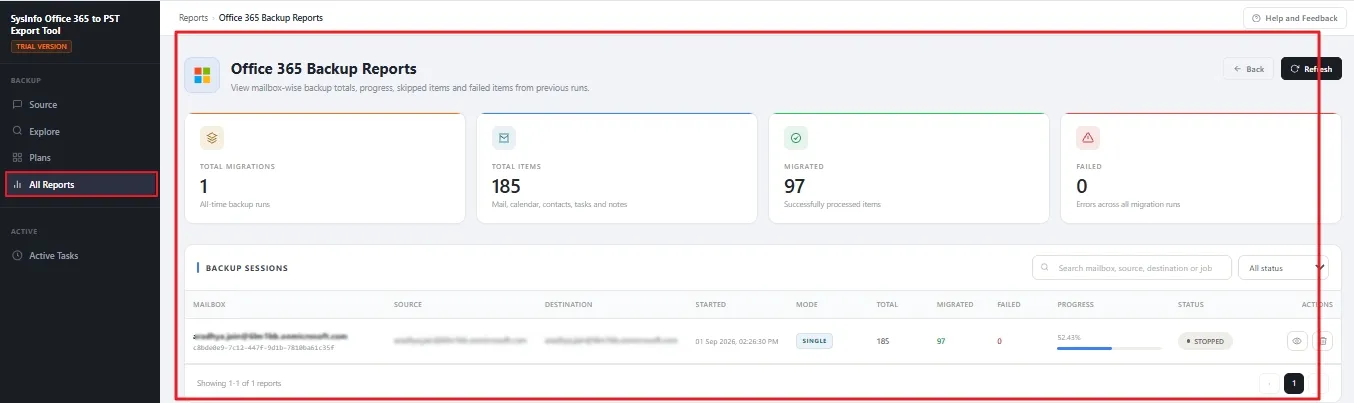
After the backup is complete, click All Reports to view the migration reports. The reports help you review the backup status and transfer details.
Steps to Backup Office 365 to PST
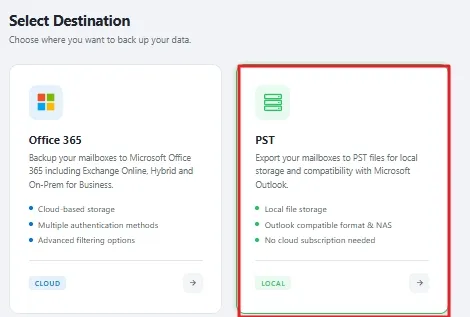
Step 08:Select PST as the Destination
To save Microsoft 365 mailbox data locally, select PST as the destination.
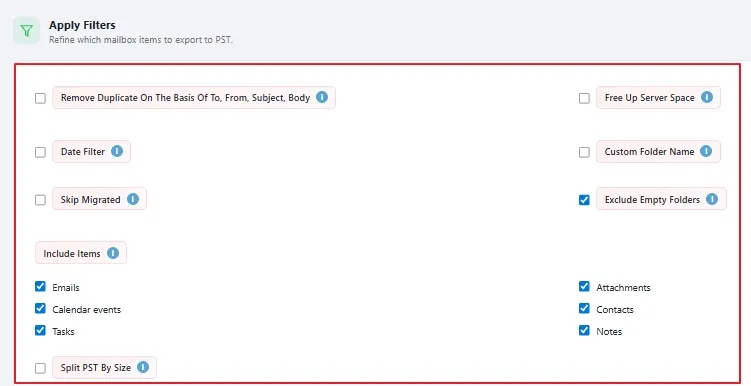
Step 09:Configure Advanced Migration Filters
Use the available filters to control how the mailbox data is backed up.
Step 10:Choose the Output Location
Click Browse and select the folder where you want to save the resulting PST files. If required, click Reset Filters to clear the selected filters. Click Start Backup to begin the Office 365 to PST backup process.

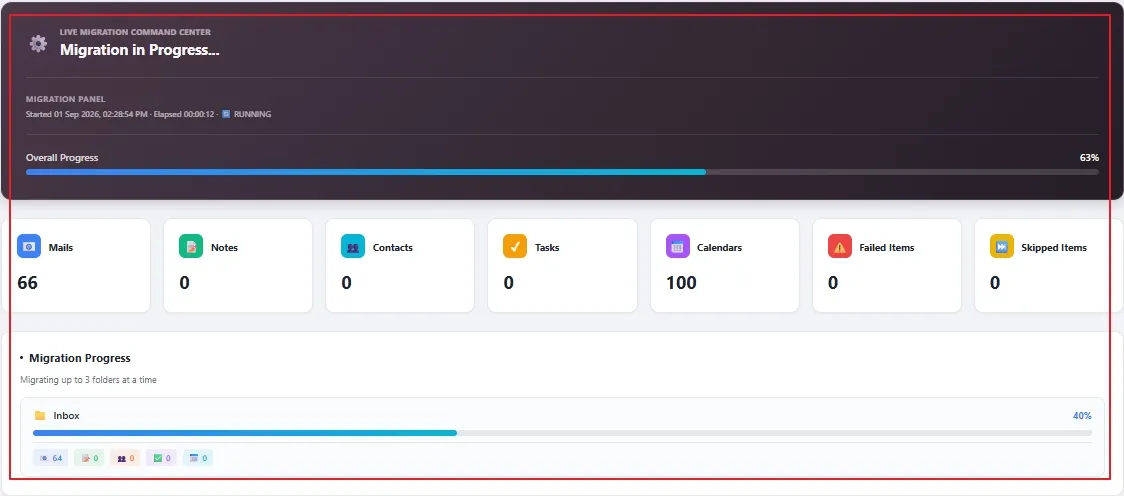
Step 11:Monitor the Office 365 to PST Backup
Once the backup starts, the tool displays the progress of the export. Monitor the transfer status and review the backup statistics in real time until the process is completed.
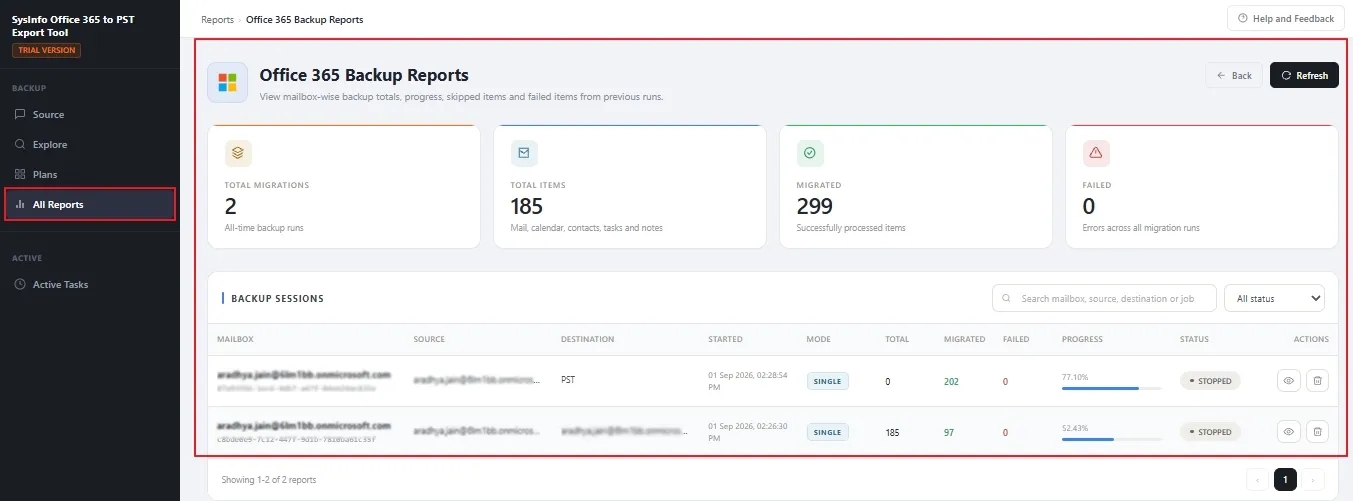
Step 12:View Backup Reports
After the Office 365 to PST backup is finished, click All Reports to view the generated backup reports. These reports provide details about the completed backup process and help verify the exported mailbox data.
System Requirements
|
Core Requirements Windows Processor: Intel® Core™2 Duo E4600 Processor 2.40GHz Mac Processor: Apple Silicon (M1 or M2) or Intel-based Mac systems Ram: 4 GB (8 GB Recommended) Disk Space: Minimum Disk Space - 1 GB Supported Windows: 11, 10, 8.1, 8, 7, 2008, and 2012 (32-bit & 64-bit) & other Windows versions. Supported Mac: macOS 10.13 High Sierra, macOS 11 Big Sur, macOS 12 Monterey, macOS 13 Ventura, macOS Sonoma, and later versions of macOS (10.15 "Catalina") |
About Product Version: 26.8 Size: 173 MB License: Multiple User Release Date: 25 August 2026 Edition: Single, Admin, Technician & Enterprise |
|
Supported Output File Office 365 and PST. |
Free Version Evaluate all the features and functions of this tool. |
Installation Guide
| Installation Guide |
|---|
|
Step 1: Download Tool Step 2: Run the Installer Step 3: Accept License & Choose Location Step 4: Install the Tool Step 5: Launch & Activate |
Note:
TroubleShooting Guide
| Issues | Possible Cause | Solution |
|---|---|---|
| Login failed during Office 365 authentication | Wrong credentials or expired session | Re-enter valid credentials or re-authenticate using Modern Authentication (OAuth). |
| Tool stuck on “Fetching Mailbox” | A large number of mailboxes or a poor internet connection | Wait for process completion or ensure stable internet; restart the tool if needed. |
| Office 365 connection timeout | Network interruption or firewall restrictions | Disable the firewall temporarily or whitelist the tool in Windows Defender. |
| Some mailboxes are not visible | Insufficient permissions for admin or user | Ensure the admin has full mailbox access and EWS/Graph permissions enabled. |
| Backup stops midway | Session timeout or large attachment size | Restart the process using “Skip Previously Migrated Data” to avoid duplication. |
| Error loading folder hierarchy | Temporary Office 365 sync issue | Re-login and reload the mailbox hierarchy; check the Exchange server status. |
| Output folder not created | Missing write permissions on the destination | Assign “Write” permissions to the output directory or choose another path. |
| Duplicate emails in backup | Duplicate filter not applied | Enable “Remove Duplicates” under filter options before running the backup. |
| Process shows 0 items backed up | Empty mailbox or filters too restrictive | Review applied filters and select the correct folders before starting backup. |
| Slow backup process | Network congestion or large data size | Reduce concurrent mailboxes or run the tool during off-peak hours. |
When to Contact Support?
If you encounter any issues that cannot be resolved using the troubleshooting guide, it is recommended to contact the SysInfo Technical Support Team for expert assistance. You should reach out when the tool fails to authenticate, crashes during backup or restore, does not accept your license key, or produces incomplete or corrupted backup files. Support is also available if you face difficulties configuring Azure permissions, understanding error codes, or using specific features. Before contacting, keep your license details, software version, and any error screenshots ready to help the team diagnose the issue quickly.
Support & Privacy Information
| Professional Support Channels | Data Privacy & Security |
|---|---|
|
Email Support Phone Support Live Chat Support Technical Expert Team |
Zero Data Storage Policy Data Privacy Maintenance Establishes a direct and secure connection with Office 365 without any third-party caching. Fully compliant with GDPR and global data protection standards. Maintains complete confidentiality of all user credentials and mailbox content. Authentication Security Audit & Compliance |
| Support Request Process |
|---|
|
Submit Request: Contact support via email, phone, or live chat with detailed issue information. Expert Assignment: A technical expert is assigned based on the issue’s complexity. Follow-Up: Comprehensive analysis and implementation of a solution. Close Loop: Verification of resolution and customer satisfaction. |
Frequently Asked Questions
Sales Frequently Asked Questions
Ans: You can purchase using major credit/debit cards, PayPal, and wire transfer through our secure payment gateway.

