How to Setup IMAP Gmail in Outlook 2016 without Facing Empty PST Files

author Written By Deep Sikha
author Approved By Sonika Rawat
Updated on 24th Sep 2024
Reading Time 5 minutes

User Query - “Outlook 2016 Exporting IMAP Gmail to PST creates empty PST, Manual move destroys email permanently - Help!”

When the user tried to export IMAP Gmail to PST, an empty PST File with a huge size was created. You may be surprised to see that these PST files do not contain anything. Therefore, to set up IMAP Gmail in Outlook successfully and to solve this issue, explore the blog below. Here, we're going to learn about cost-free solutions and a Gmail Backup Tool. This will help to ease your task and make the process quick.

Understanding the Issue

When exporting Gmail to PST with IMAP, it creates an empty PST file when opening with Outlook. So, the problem is that the PST file created in Outlook 2016 has a size of 6 GB. But when the folders are selected to open, no emails are found. This issue can be solved by changing the view of the folder to ‘IMAP’. Go ahead in the below sections to understand in detail.

Methods to Setup IMAP Gmail in Outlook without Facing Empty PST Files

There are different manual ways to solve the “ IMAP Gmail to PST creates Empty PST File” problem during setup. Furthermore, we have a professional tool to directly convert Gmail emails to Outlook PST. Explore this section carefully to learn a step-by-step process for all the methods.

Manually Configuring IMAP Gmail in Outlook 2016

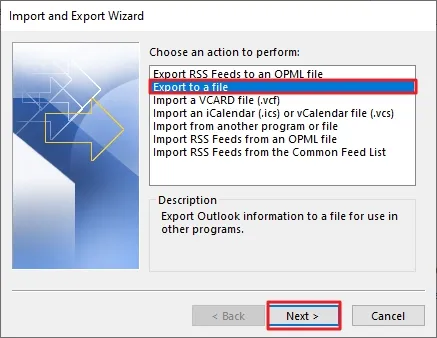
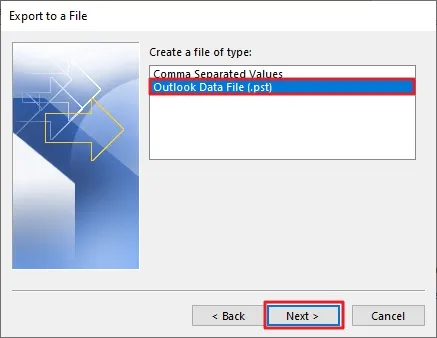
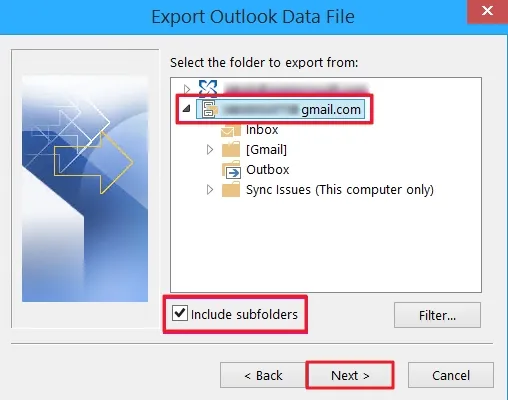
You can configure the Gmail in Outlook using IMAP by following these steps:

  1. Login to your Gmail account and click the Settings icon.
  2. Navigate to the Forwarding and POP/IMAP tab and Enable IMAP from IMAP Access.
  3. Hit the Save Changes button.
    img
  4. Now, launch Outlook and go to File >> Info >> Add Account.
  5. On the Auto Account Setup window, enter your Gmail account name, email ID, and password. Click Next > Finish.
  6. Now, to import its content into PST format, again click File >> Open & Export >> Import/Export in Outlook.
  7. Further, choose the Export to a file option from the list and click Next.
    img
  8. Afterward, select Outlook Data File (.pst) and hit Next.
    img
  9. Now, select the email address of your Gmail account and check the Include Subfolders option. Press Next.
    img
  10. Subsequently, click Browse and select Destination to save converted Gmail to PST. In addition, choose other options and finally hit the Finish button.

Now, you have successfully set up a Gmail account in Outlook and created PST files. However, to solve the problem of Empty PST files that may occur during this, follow the steps below.

1. Setting the Root Folder for IMAP Account

  1. Launch Outlook and initially, open the Account Settings tab.
  2. For Outlook 2007: Go to Tools >> Account Settings >> tab E-mail.
    • For Outlook 2010, 2013 and 2016:
    • Go to File >> Info >> Account Settings >>Account Settings>> tab E-mail.
  3. Now, double-click on your Gmail IMAP account and hit More Settings.
  4. Further, choose the Advanced tab, and at the bottom is the Root folder path option. Set the option to Gmail.
    img
  5. You will receive a notification. “IMAP cache needs to be restored after setting the option and verifying your way out of all the opened dialogs.”
  6. In some instances, the Sent Items and Deleted Items folder need to be configured again for the Gmail IMAP account.
    img

    Before

    img

    After(Using [Gmail] as the root folder)

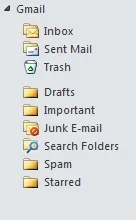
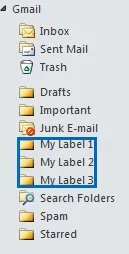
2. Return your labels to Outlook
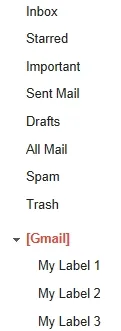
  1. Now, use Gmail as the mailbox root folder. Labels are created on a higher level such that you are unable to see your Gmail Label folders in Outlook.
  2. One way around this is to prefix [Gmail]/ for each of your labels. Thus a label called My Label 1 can be changed via the Gmail web interface to [Gmail]/My Label 1.
  3. You can also create a [Gmail] label and configure My Label 1 as a nested [Gmail] label instead of prefixing the labels.
    img

    Gmail

    img

    Outlook

3. Make Group of Labels

Since you're working on Outlook's [Gmail] root folder now. You'll see all of your labels just under your main mailbox. This could end up being a long list and make it more difficult to remember the system folders in Gmail. Therefore, to fix this:

  1. Create a new label in the web interface under the [Gmail] label and name it ‘Labels,’ for example. Now you can build a nested Label of the Labels folder for all your Labels.
  2. Additionally, as the / character is used as a separator to indicate a subfolder. You can also prefix your labels with [Gmail]/Labels/.
    img

    Gmail

    img

    Outlook

4. Make Subfolders in Outlook and Labels in Gmail

If you want to create a subfolder in the Inbox folder. The Label: Inbox/My subfolder will be generated in the Gmail web interface. This is the final step to solve the settings of IMAP Gmail to Outlook.

  1. You can use the Gmail web interface to create a new label: [Gmail]/Inbox/ My subfolder.
  2. Unlike any INBOX/name subfolders, [GMAIL]/Inbox/ prefixed folders will appear as an Inbox subfolder in Outlook. Even when the mailbox is rooted in [Gmail].
    img

    Gmail

    img

    Outlook

These are all manual approaches for Gmail IMAP settings in Outlook to solve the issue. However, these processes are lengthy. Also, it takes time to solve the issue and then convert Gmail to PST. So, for this, we have an expert solution discussed below.

Automated Tool to Transfer Gmail to PST in Outlook

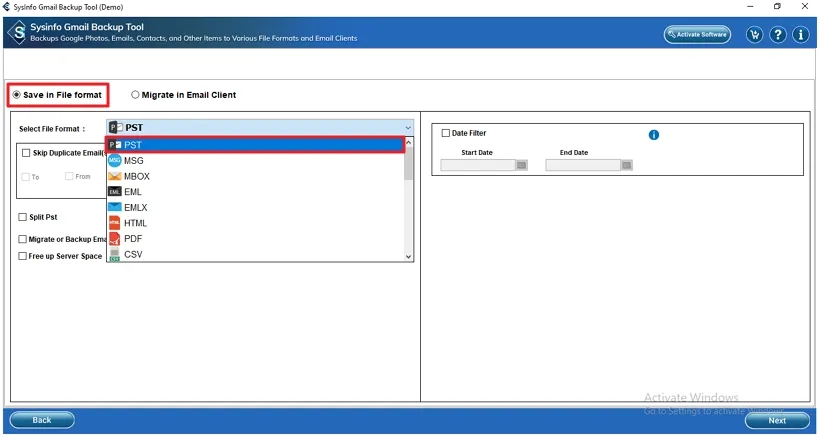
The manual process to set up IMAP Gmail in Outlook without Empty PST issues is quite tricky. Therefore, we have an expert-recommended comprehensive solution i.e. the SysInfo Gmail Backup Tool. With this software, you can quickly convert Gmail to PST in just no time. It allows data conversion without any loss or modifications. The software has an interactive GUI and allows exporting of Gmail items like emails, contacts, calendars, and photos. Additionally, it has some exclusive features that make it the best option, such as:

  • Export Gmail emails into 15+ file formats and to multiple email clients
  • Converts single and multiple emails at once with 100 % data accuracy.
  • Also, it is widely compatible with all the Windows older and latest versions.

Step-By-Step Guide to Migrate Gmail to PST Files

  1. Launch the software as an administrator.
  2. Select Gmail (Backup Emails Only) and enter your credentials. Click Sign In.
  3. Select the folders from the preview panel that you want to transfer.
    img
  4. Further, choose Save in File Format and select PST from the options list.
    img
  5. Furthermore, choose the required filter options and click Next.
  6. Subsequently, hit the Save Path button and assign a location for the new PST
  7. At last, click the Download button to initiate the process.
Conclusion

This blog is based on a user query “IMAP Gmail to PST Creates Empty PST File”. It is generated because of the Gmail IMAP settings in Outlook. Therefore, we have given all the possible ways to solve this issue and setup IMAP Gmail in Outlook. Also, we have provided a direct way for Gmail to PST conversion. The manual ways may have some limitations and risks. But with the professional tool, you can easily convert Gmail to Outlook PST without hassle.

Frequently Asked Questions

Q1. How do I configure IMAP Gmail in Outlook?

Ans. To configure IMAP Gmail in Outlook, follow these steps
  1. Sign in to your Gmail and hit the Settings icon.
  2. Move to Forwarding and POP/IMAP and Enable IMAP. Click Save Changes.
  3. Now, open Outlook and click File > tab Info > select Add Account.
  4. The Auto Account Setup window opens. Enter your Gmail account's required credentials. Click Next and finally hit Finish.