Azure Active Directory (Azure AD) is a cloud-based identity and access management service from Microsoft. An Azure AD application is a way to register and manage applications in the Azure environment. Creating an Azure AD application is essential to enable secure access to resources and APIs. One common use case is logging into tools like the Office 365 Backup Tool. This tool requires authentication through Azure AD to ensure that only authorized users can access backup services.
The guide will provide clear steps on how to create an Azure Active Directory application and enable the necessary API permissions. This is to ensure smooth operation and security for your applications.
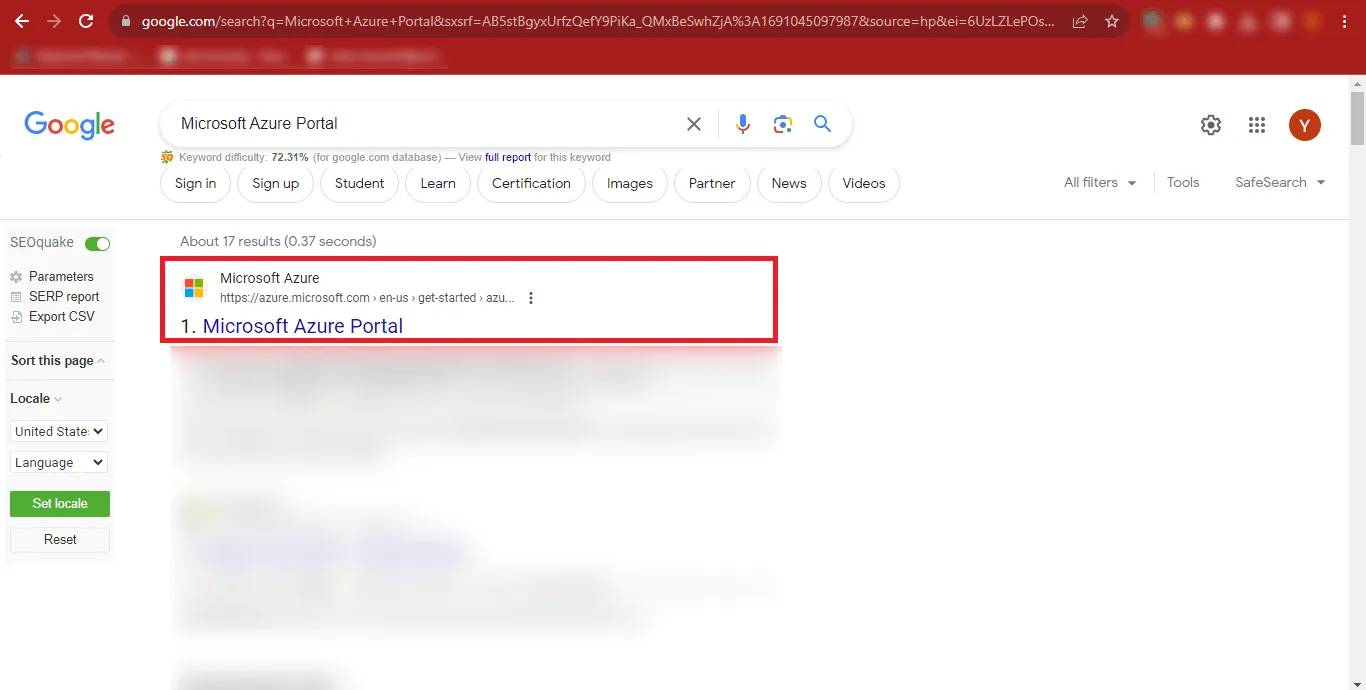
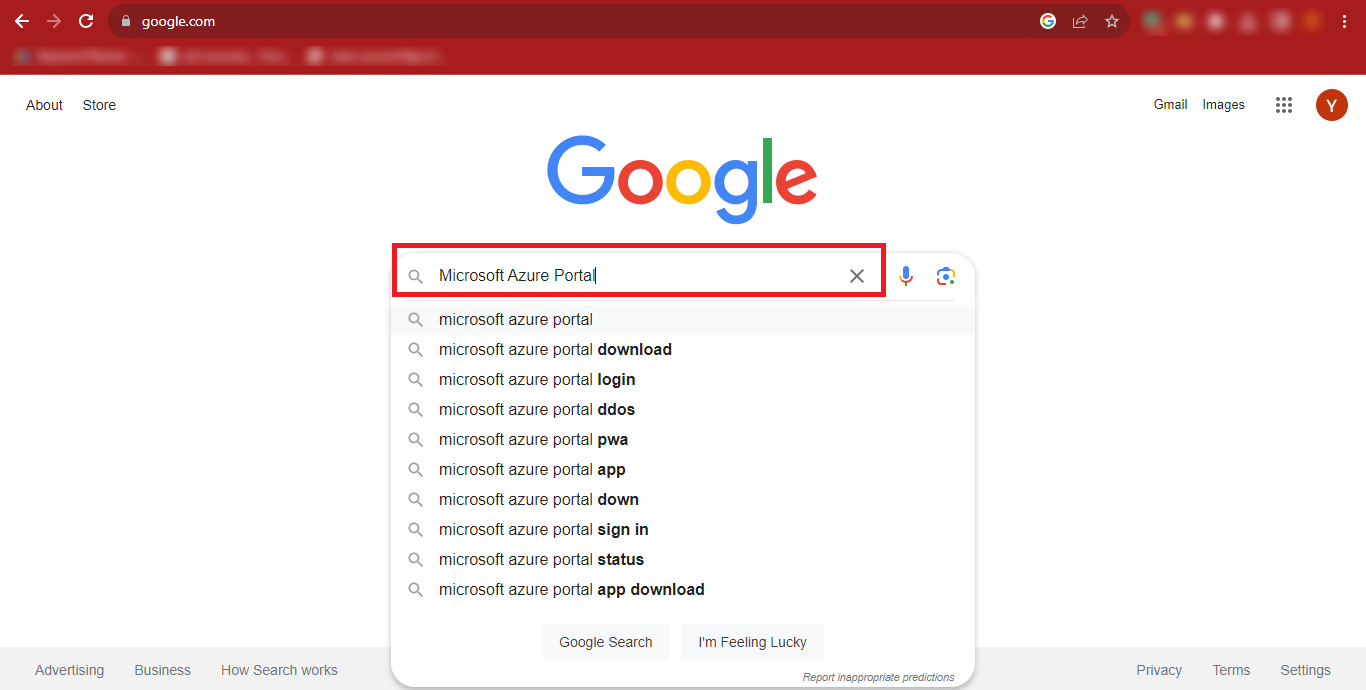
Step 1: Open Google and Search for the Microsoft Azure Portal.

Step 2: Click on the First Result that appears in the Google
Search Results. You can Directly Click on https://azure.microsoft.com/en-us/get-started/azure-portal
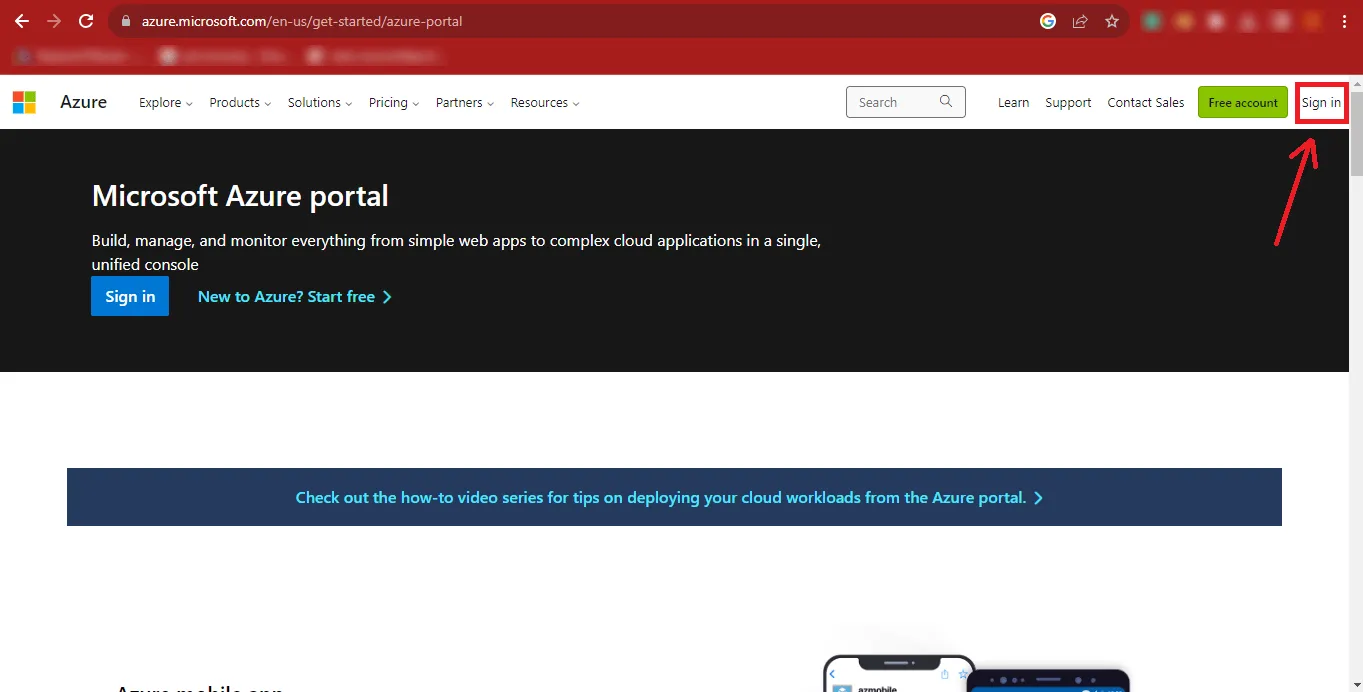
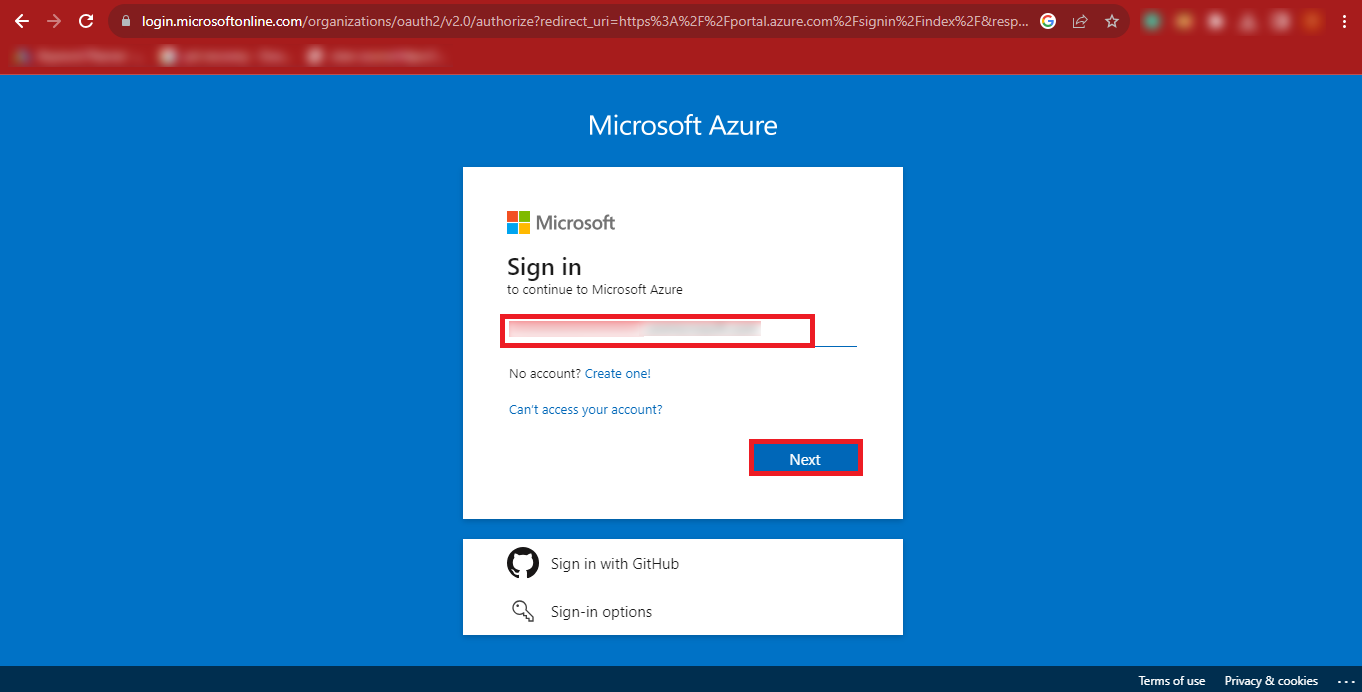
Step 3: The Microsoft Azure Portal will appear in front of you.
Click on the Sign In button at the Top-Right Corner of the Page.
Step 4: Now Enter your Microsoft Admin ID and click on the Next
button.

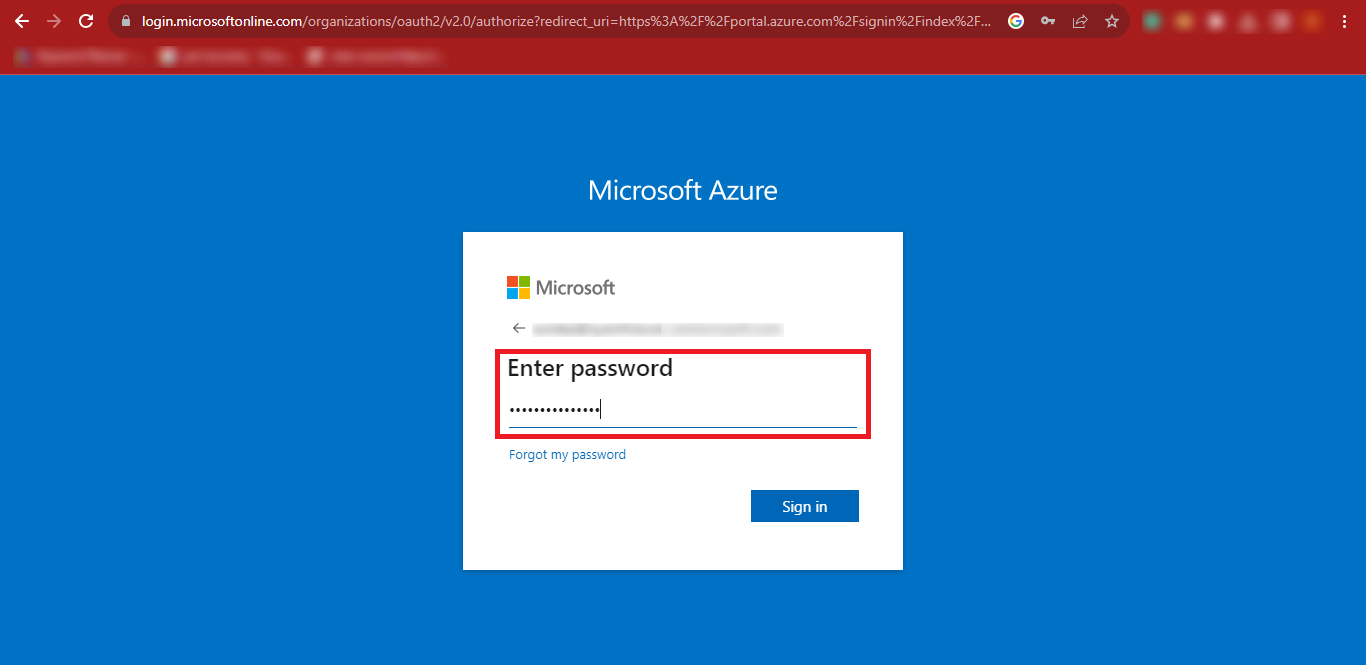
Step 5: Provide your Password and click on the Sign
In button.

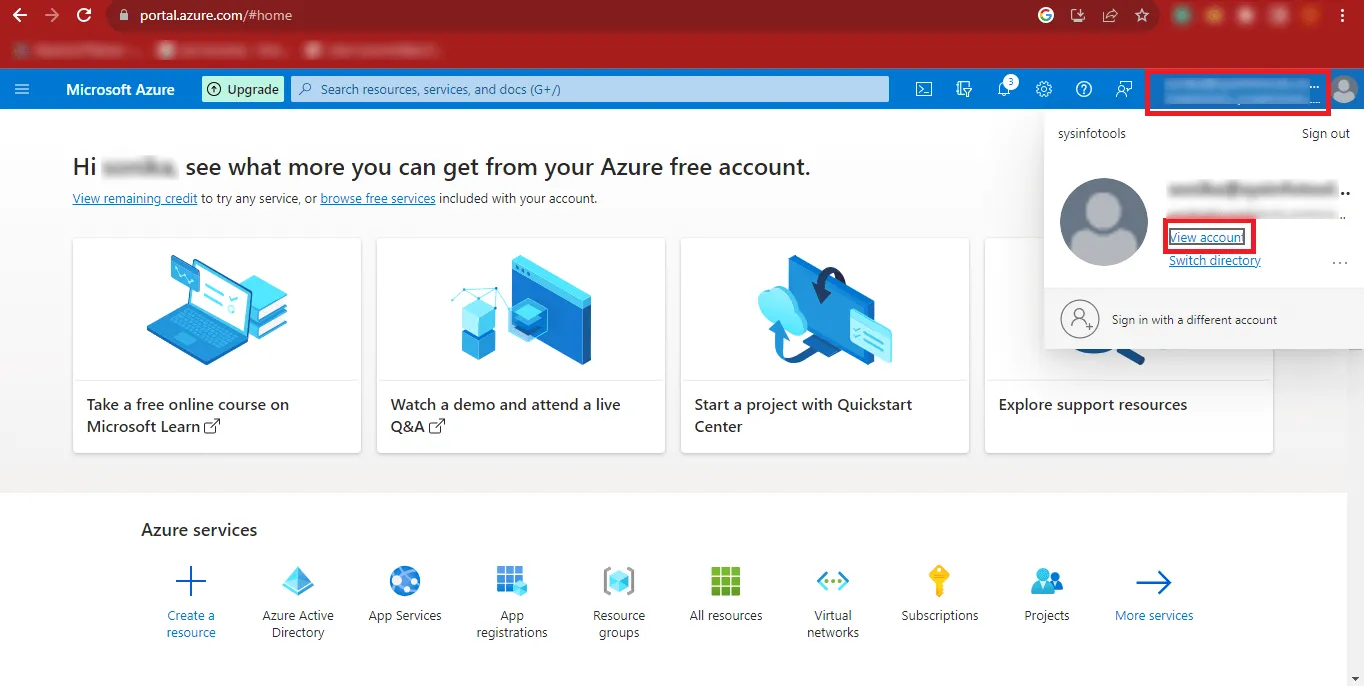
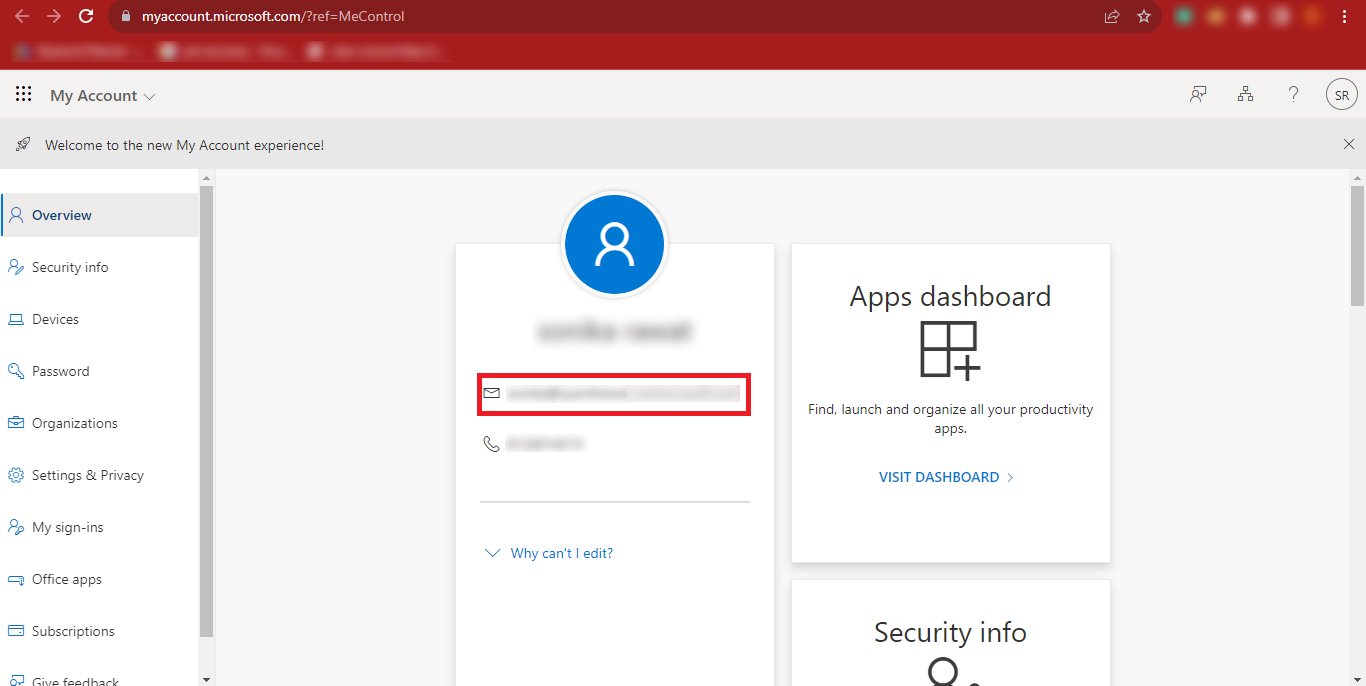
Step 6: Then you will have to click on the User ID at the
top-right corner of
the Page and click on the View Account Link.
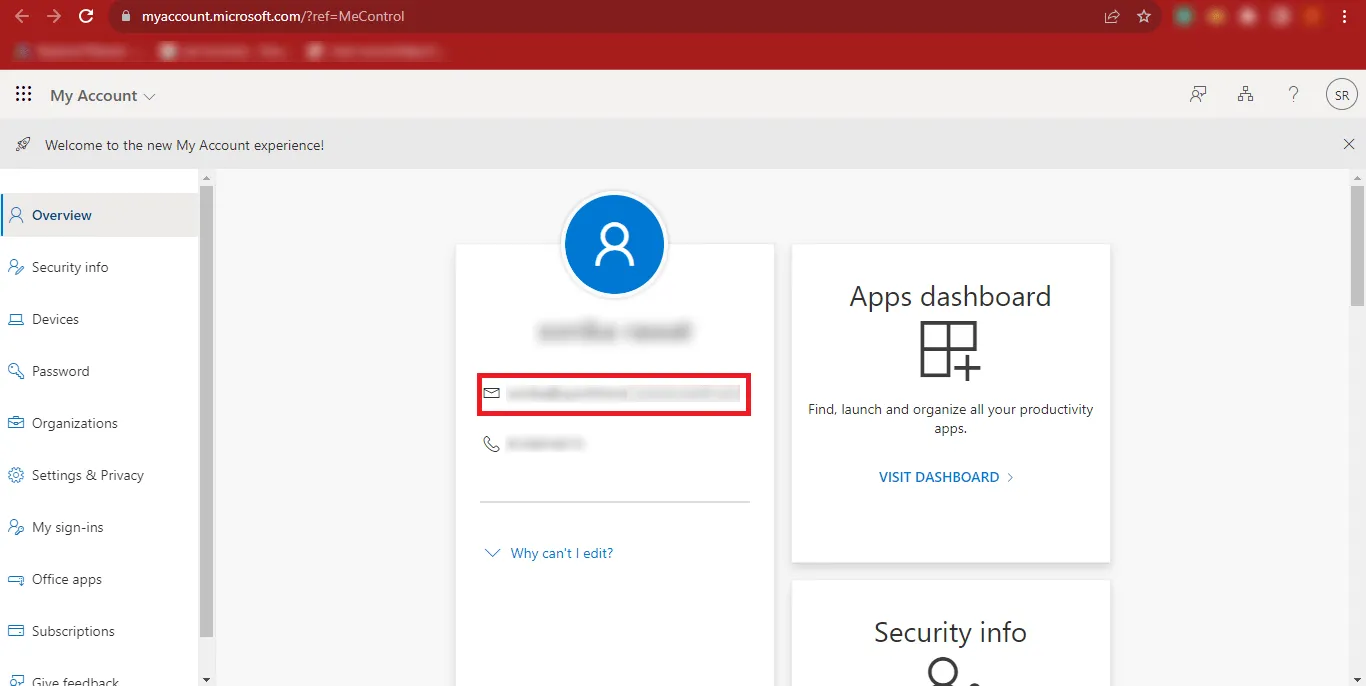
Step 7: Copy your Admin ID and Paste it at a Safe
Location.
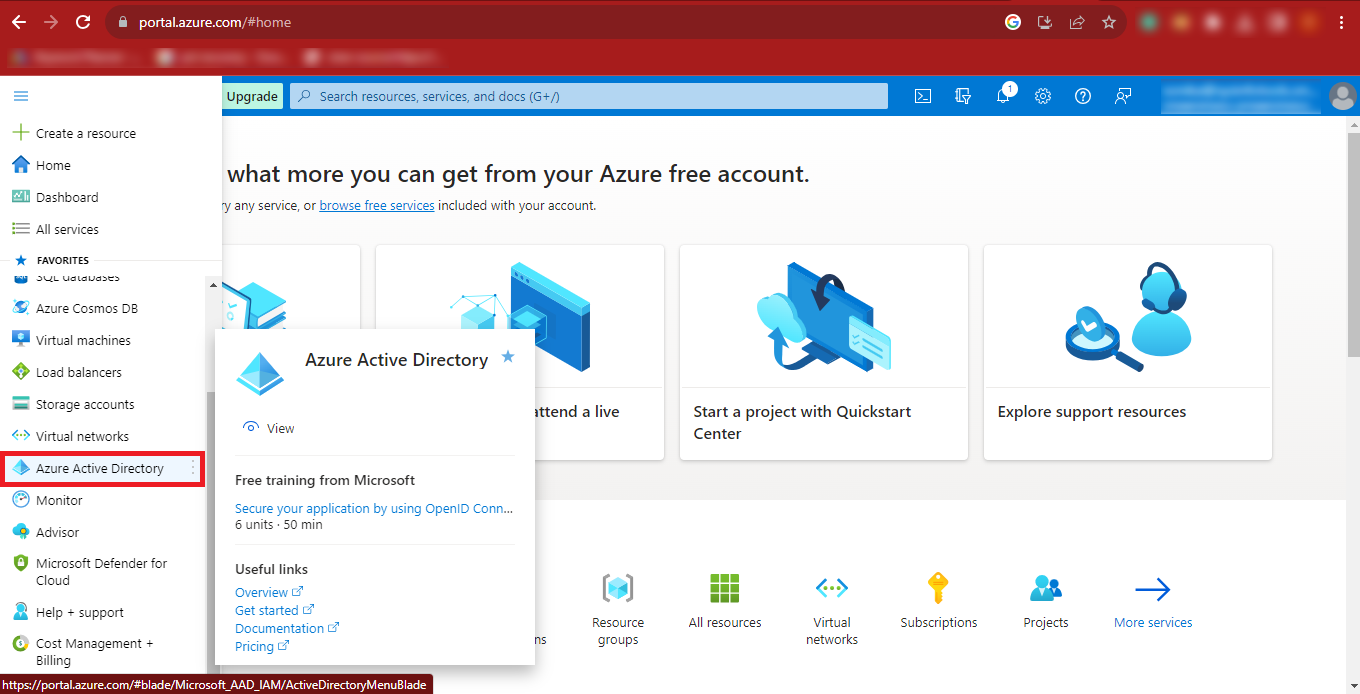
Step 8: Return back to the previous page and click on the Three Bars at the
Top-Left Corner of
your Page.
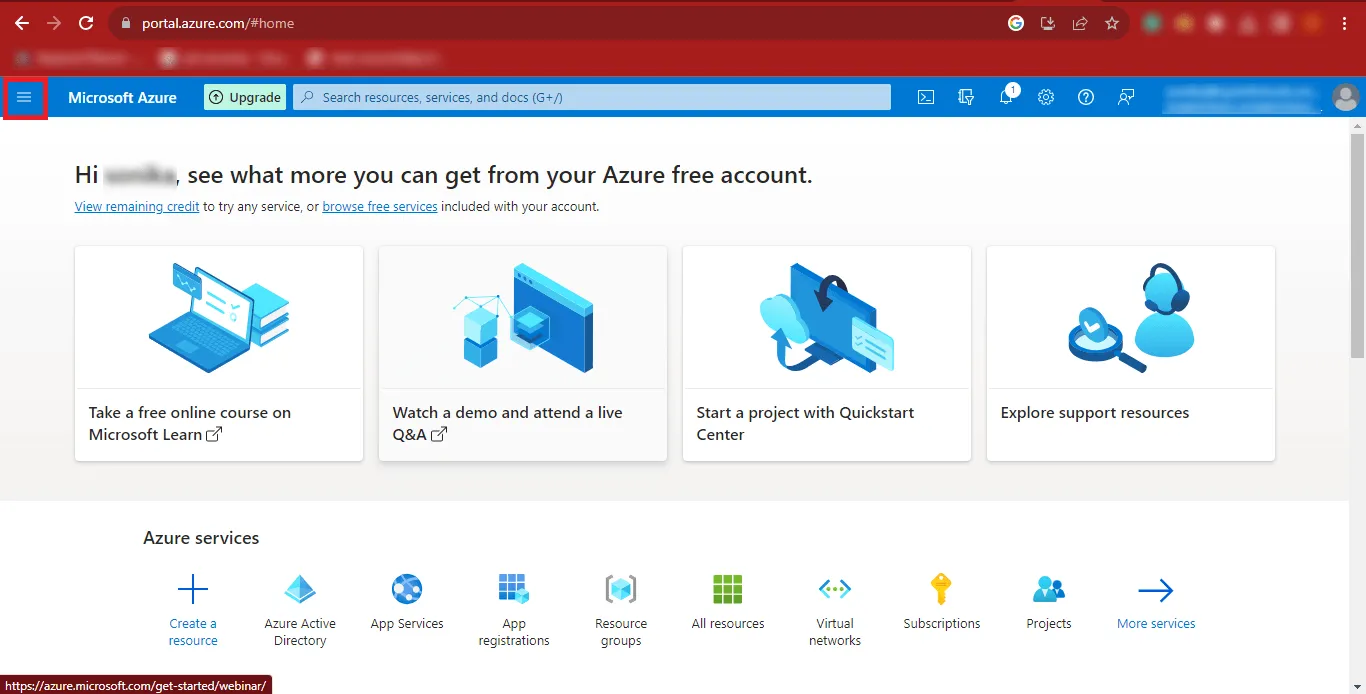
Step 9: Then click on the Azure Active Directory option.
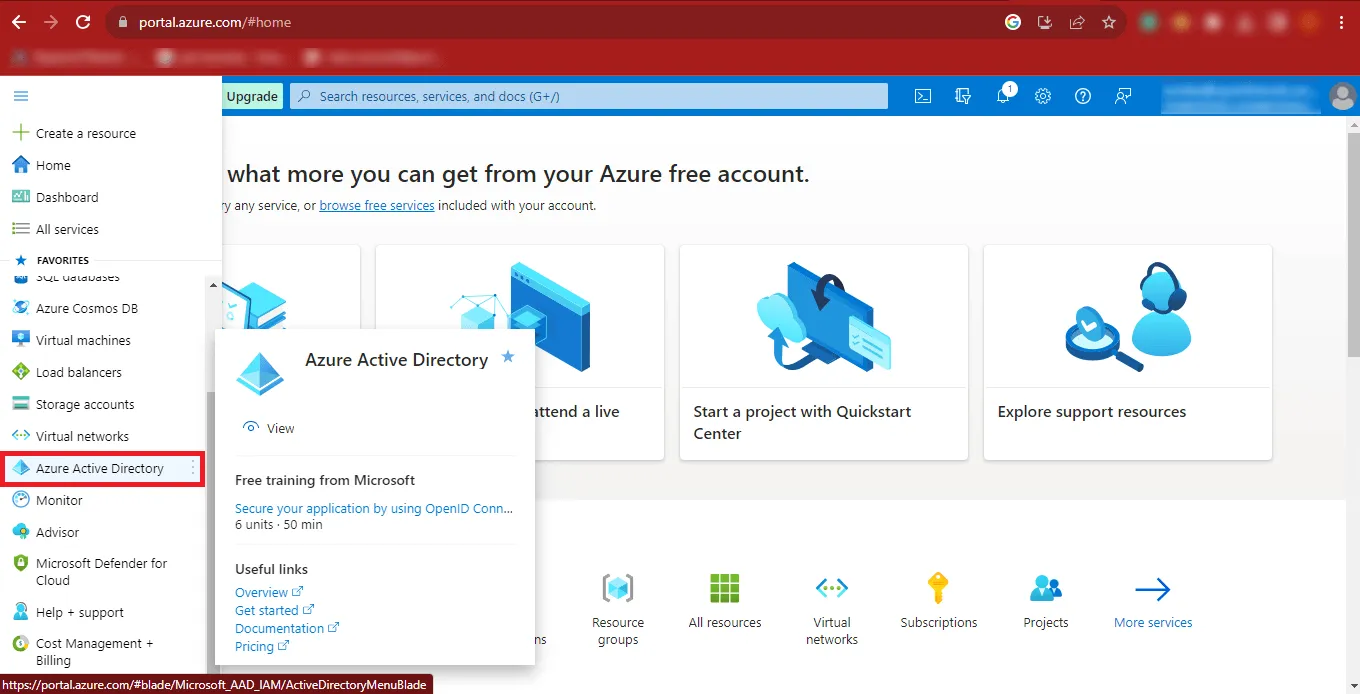
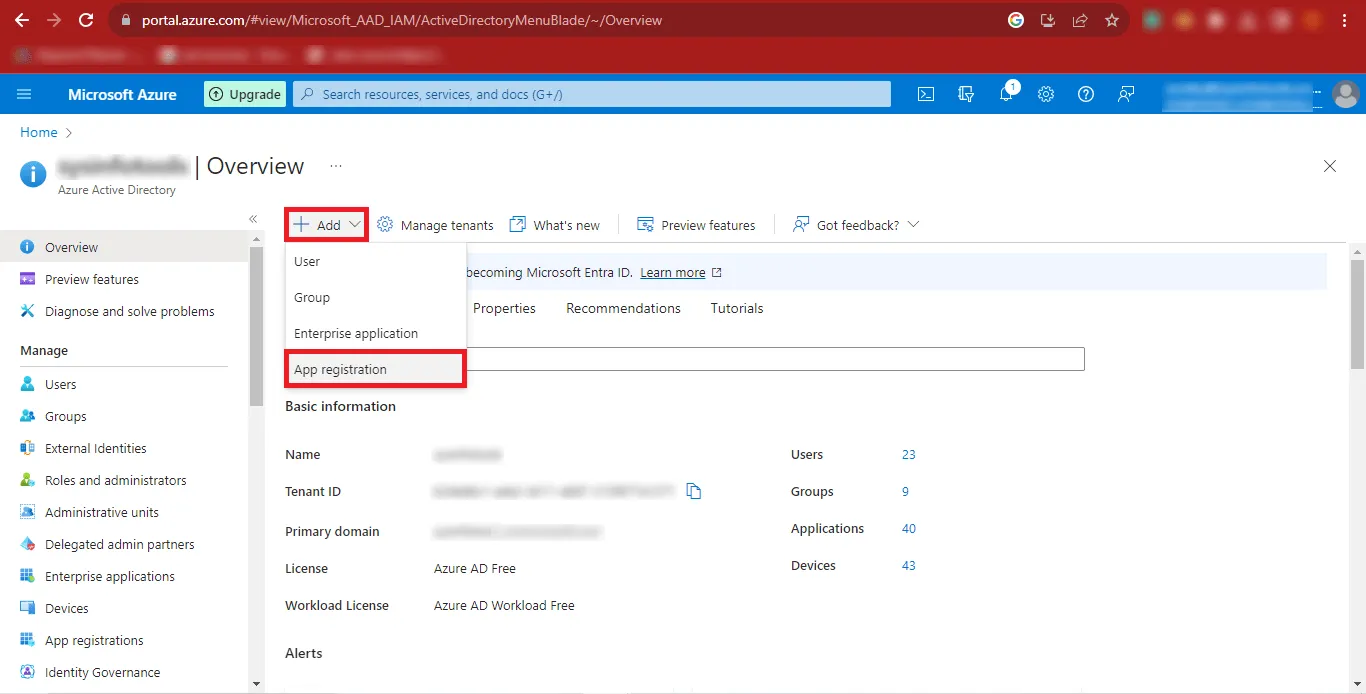
Step 10: Now the Azure Portal will appear on your screen.

Step 11: Click on the Add option and once it expands, click on the App
Registration Option.
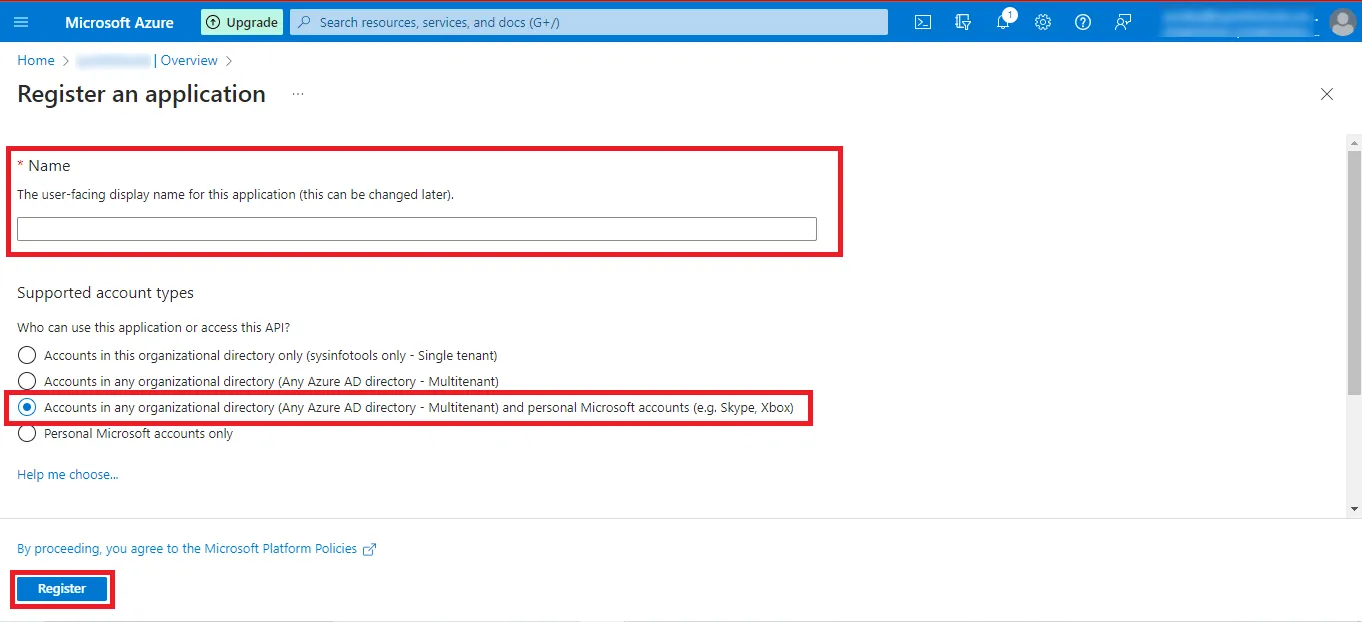
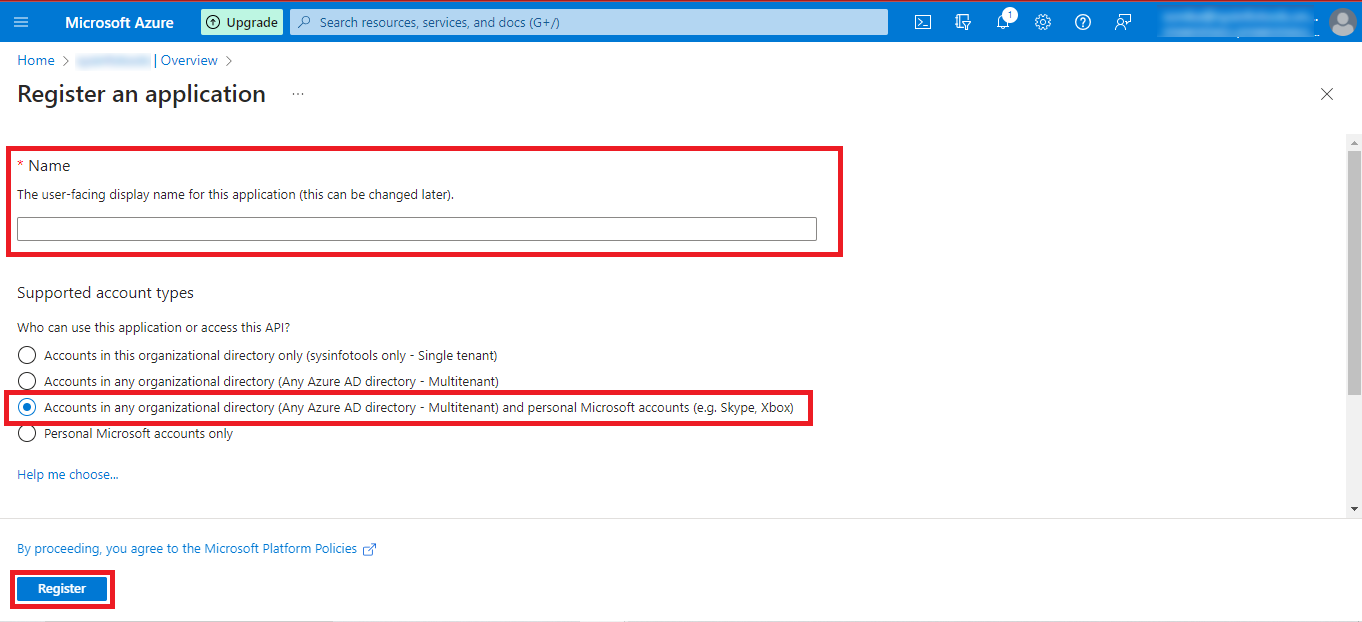
Step 12: Now enter the desired name you want to give in the Name
Box and Mark
the Third Option i.e. “Accounts in any organizational directory (Any
Azure AD directory - Multitenant) and personal Microsoft account (e.g. Skype,
Xbox)” option. Click on the Register Button to Continue.
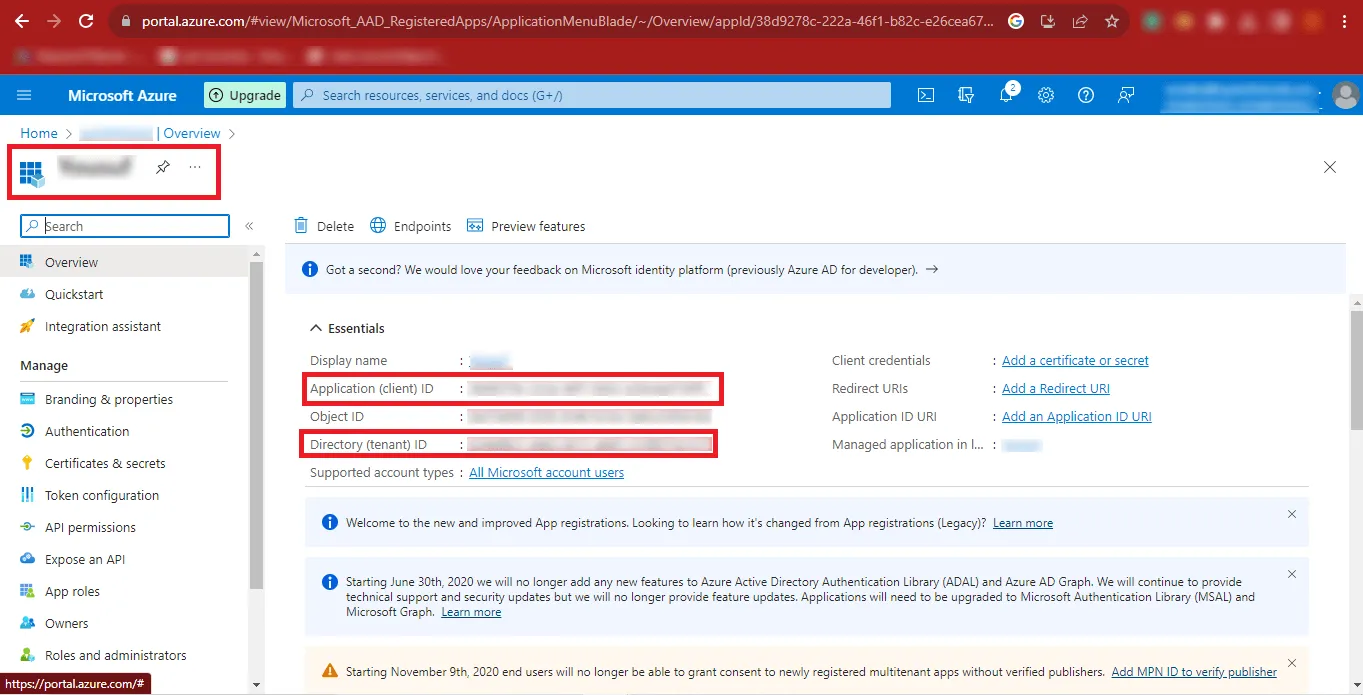
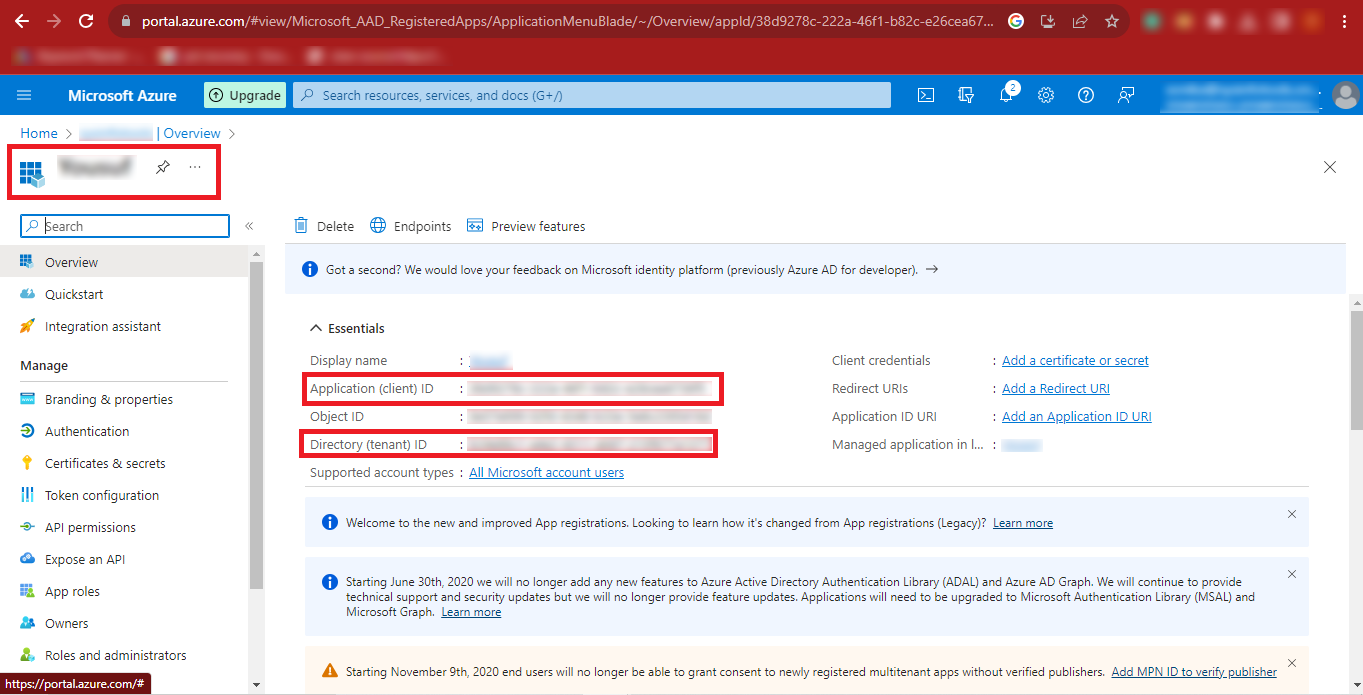
Step 13: Now you can see the Given Name, Application (client) ID, Directory
(tenant) ID, and other details. Copy the Application (client) ID and Directory (tenant) ID and
paste them at a safe place.
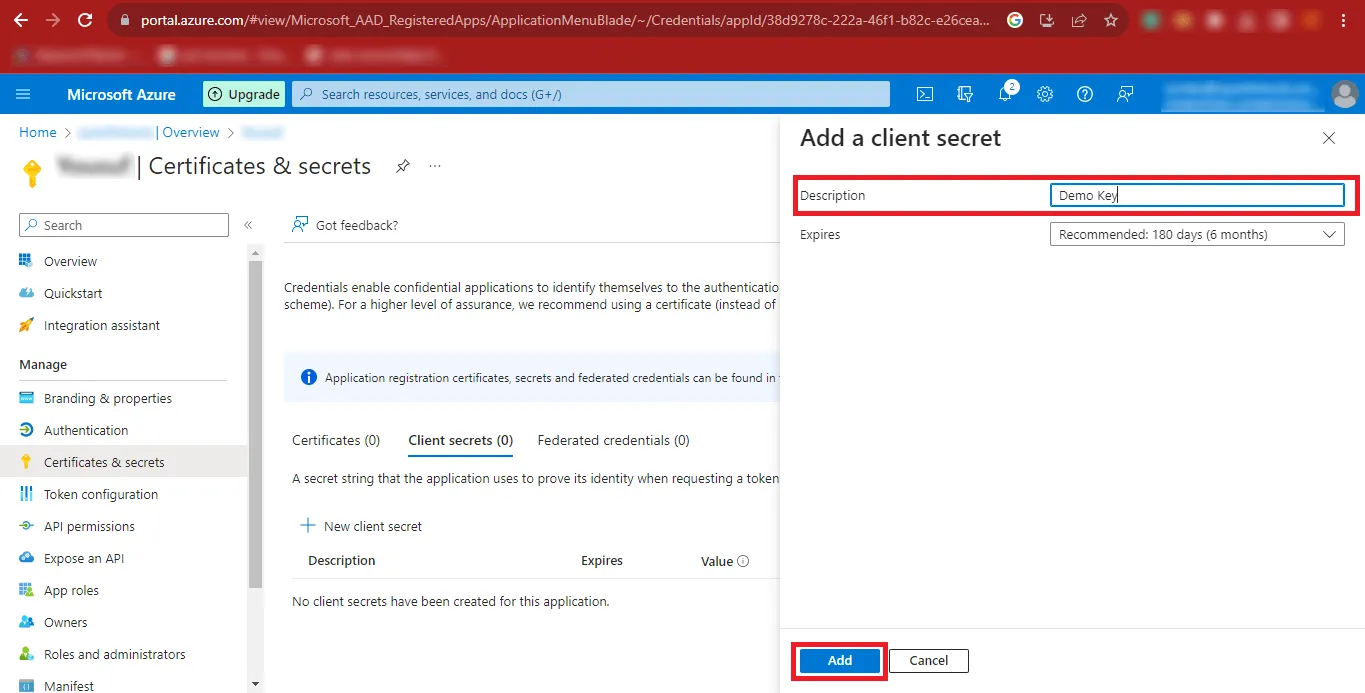
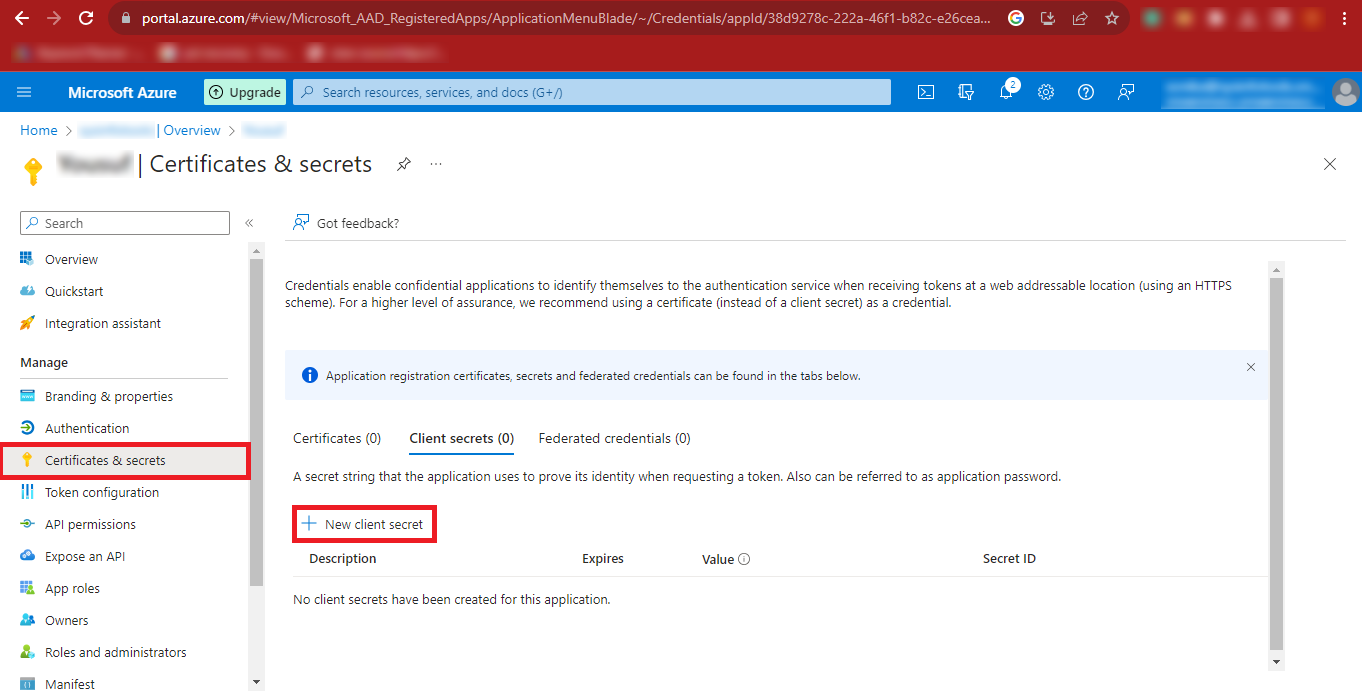
Step 14: Then click on the Certificates & Secrets option on the left side of the
page and click on the New client secret option.

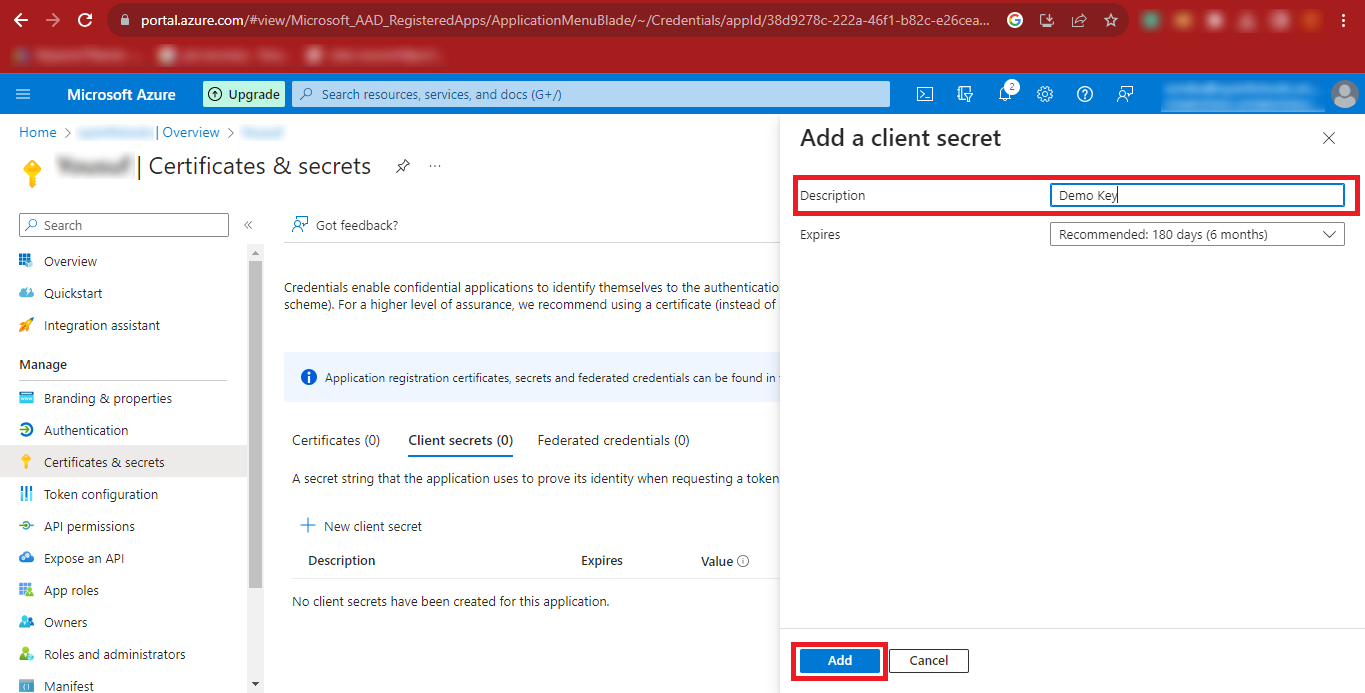
Step 15: In the Description Box enter any name you want to
enter and click on the Add button.
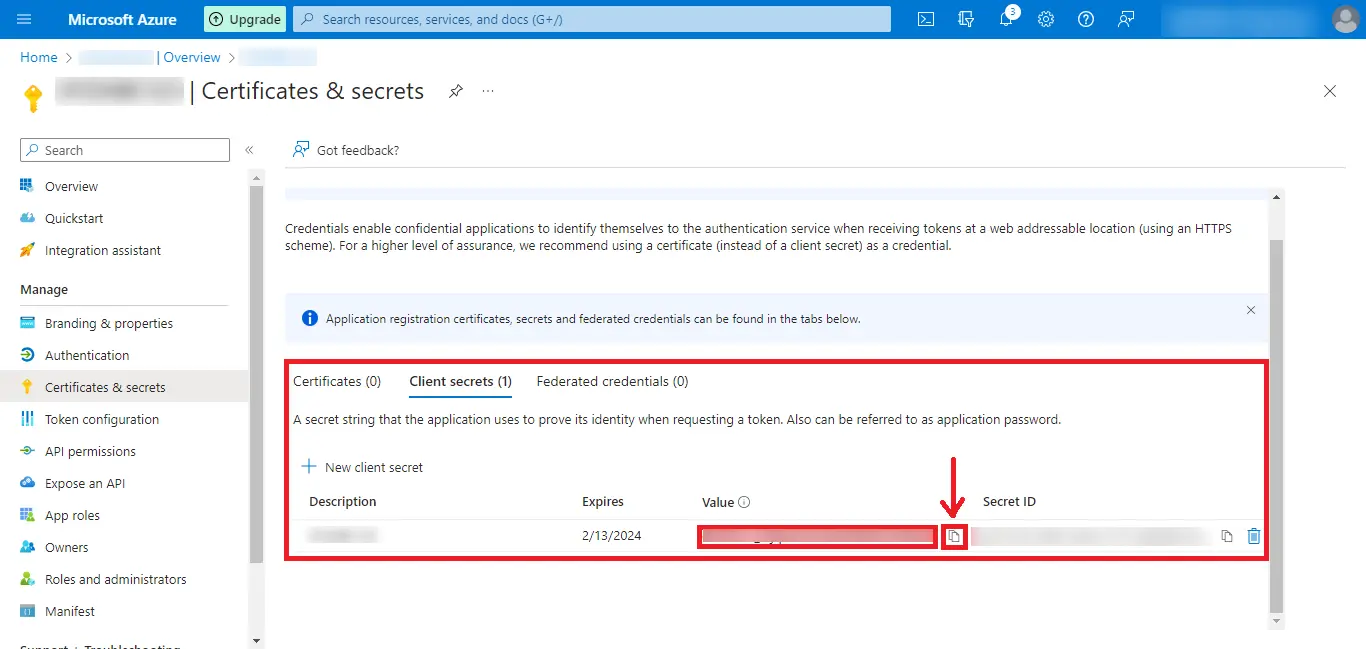
Step 16: After the above step, your Value will be created.
Click on the Copy Icon and paste the Value at a Safe Place.
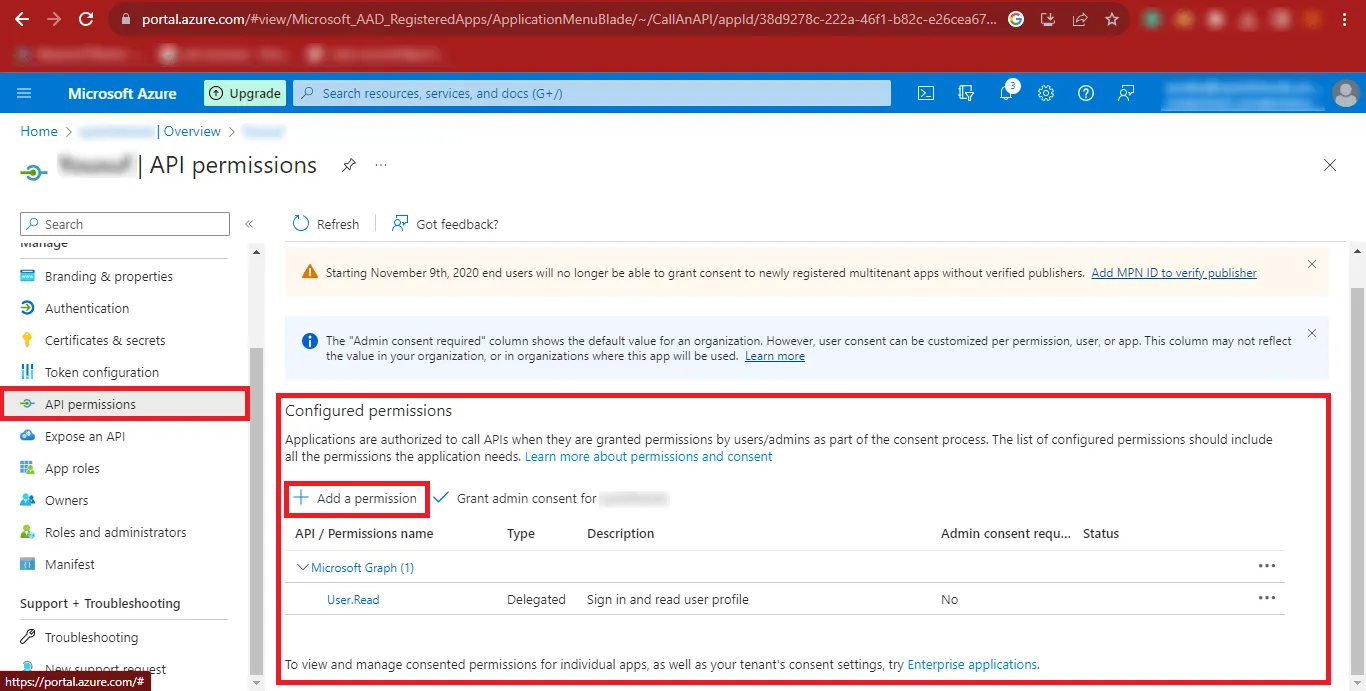
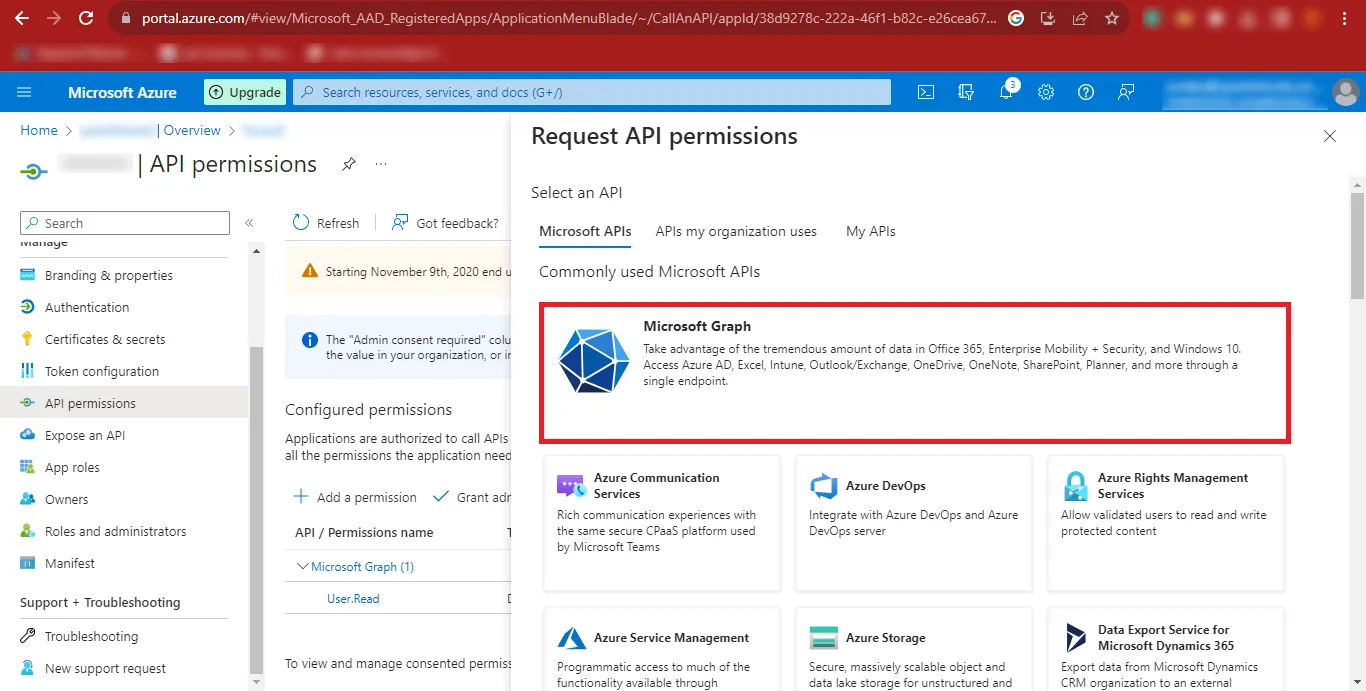
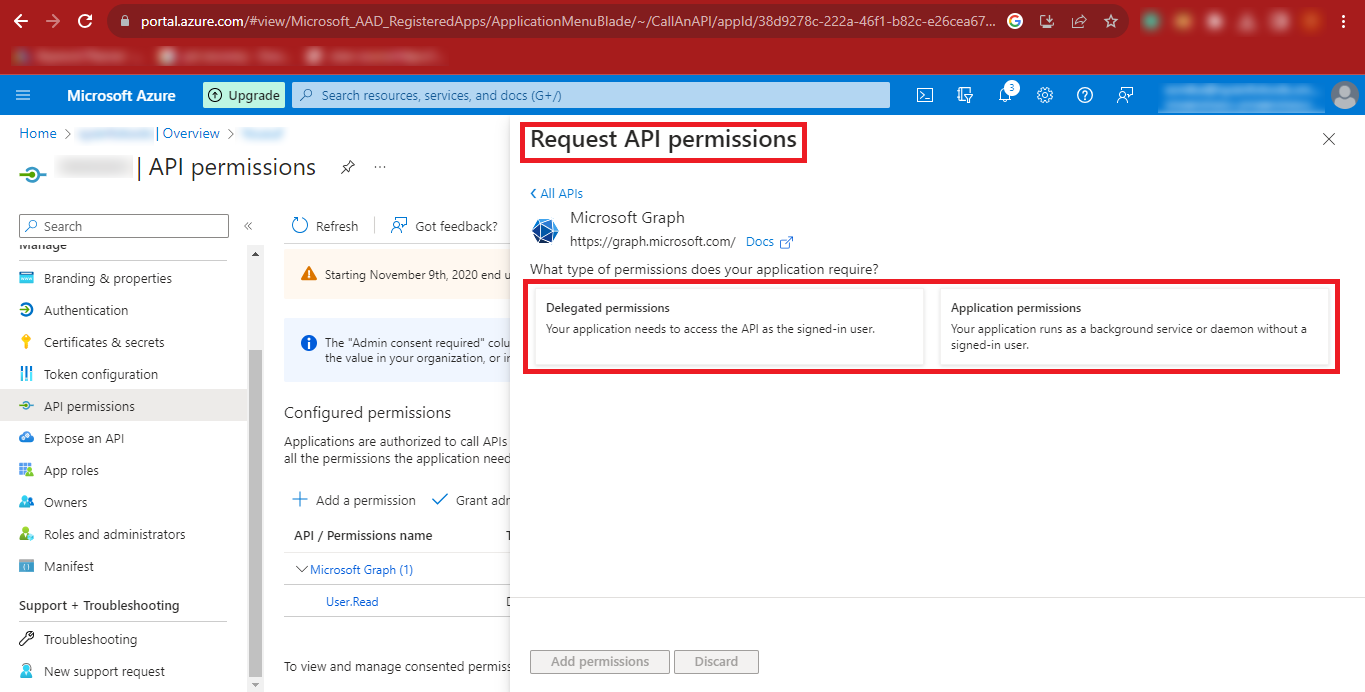
Step 17: Click on the API Permissions option and in the Configured
Permissions Section click on Add a Permission.
Step 18: Now Click on Microsoft Graph in the Request API
permissions Panel.
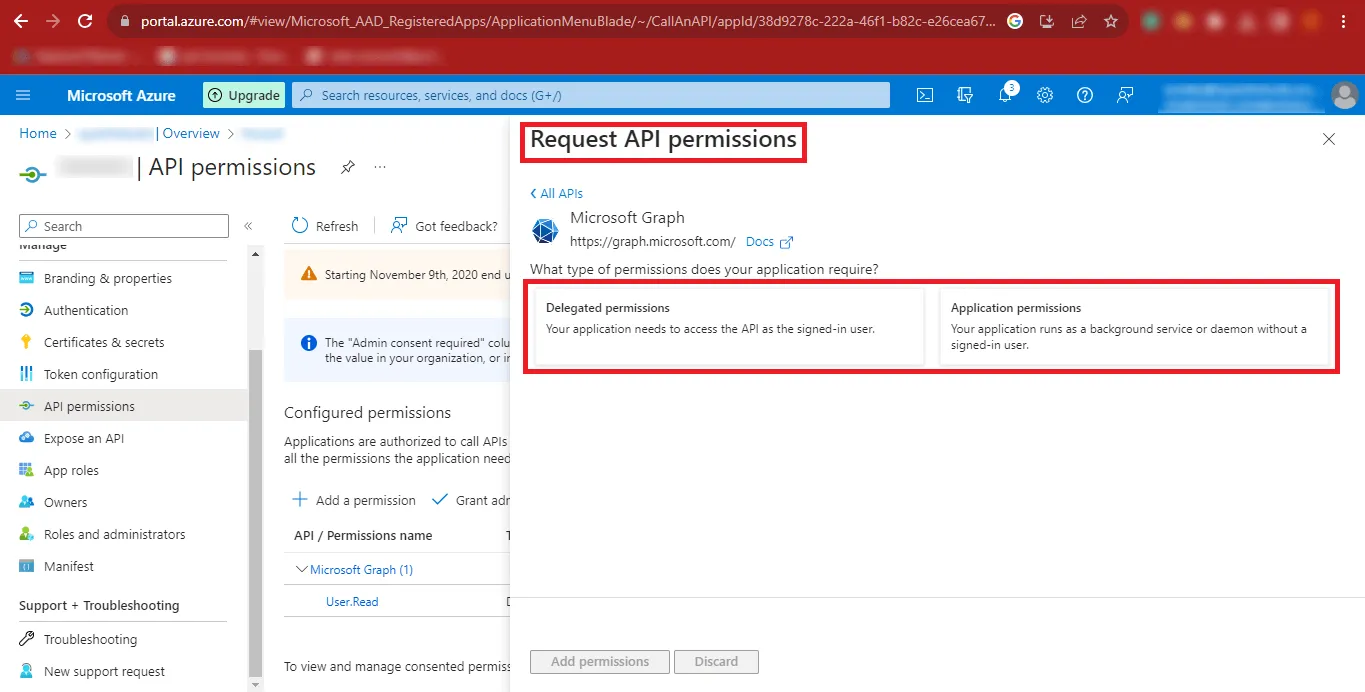
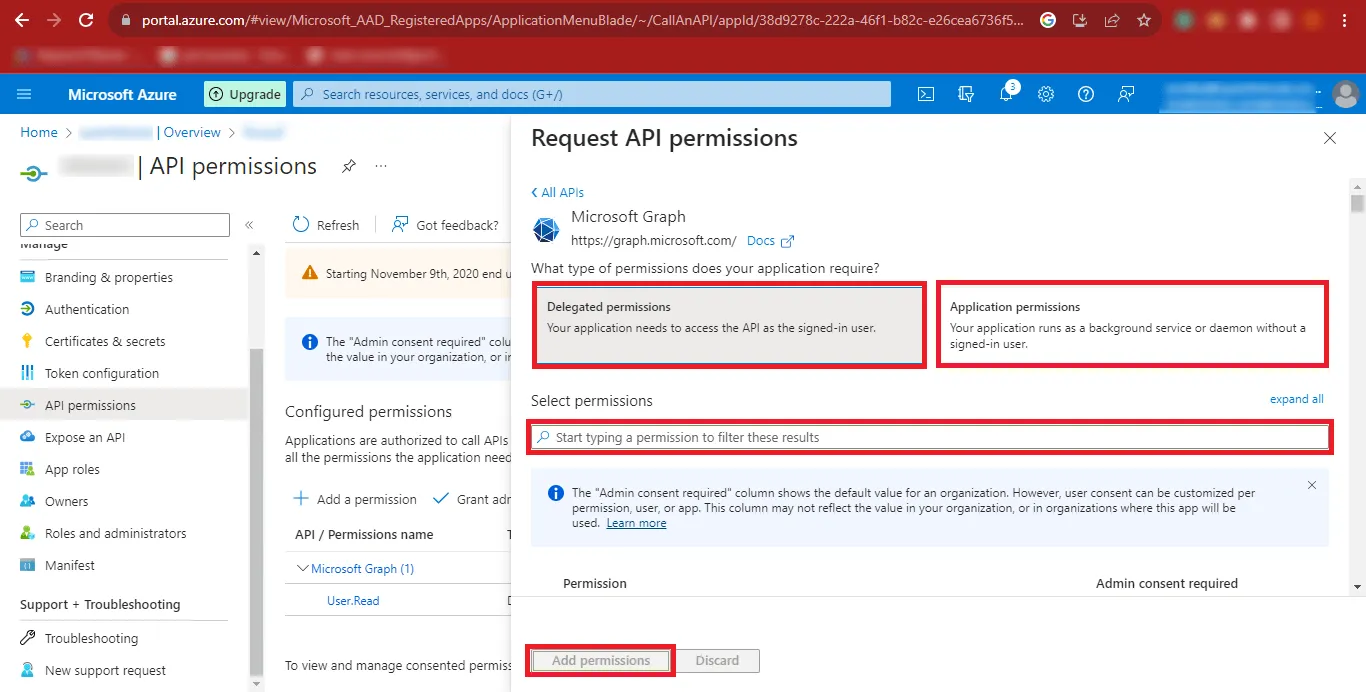
Step 19: Now you will have to give the Delegated Permissions and Application Permissions.
Step 20: Search the following Permissions as Given in the Table below and Add
them.
| API/Permissions Name | Description | Admin consent required | Status |
|---|---|---|---|
| DelegatedPermissionGrant.ReadWrite.All | Manage all delegated permission grants | Yes | Granted for Project |
| Directory.Read.All | Read directory data | Yes | Granted for Project |
| Directory.ReadWrite.All | Read and write directory data | Yes | Granted for Project |
| Files.Read | Read user files | No | Granted for Project |
| Files.Read.Selected | Read files that the user selects (preview) | No | Granted for Project |
| Files.Read.Write | Have full access to user files | No | Granted for Project |
| Files.ReadWrite.All | Have full access to all files user can access | No | Granted for Project |
| Files.ReadWrite.AppFolder | Have full access to the application's folder (preview) | No | Granted for Project |
| Files.ReadWrite.Selected | Read and write files that the user selects (preview) | No | Granted for Project |
| Group.ReadWrite.All | Read and write all groups | Yes | Granted for Project |
| Sites.Read.All | Read items in all site collections | No | Granted for Project |
| User.Export.All | Export user's data | Yes | Granted for Project |
| User.Manageldentities.All | Manage user identities | Yes | Granted for Project |
| User.Read | Sign in and read user profile | No | Granted for Project |
| User.Read.All | Read all users' full profiles | Yes | Granted for Project |
| User.ReadBasic.All | Read all users' basic profiles | No | Granted for Project |
| User.ReadWrite | Read and write access to user profile | No | Granted for Project |
| User.ReadWrite.All | Read and write all users' full profiles | Yes | Granted for Project |
| API/Permissions Name | Description | Admin consent required | Status |
|---|---|---|---|
| Files.ReadWrite.All | Read and Write files in all site collections | Yes | Granted for Project |
| User.Export.All | Application Export user's data | Yes | Granted for Project |
| User.Invite.All | Invite guest users to the organization | Yes | Granted for Project |
| User.Manageldentities.All | Manage all users' identities | Yes | Granted for Project |
| User.Read.All | Read all users' full profiles | Yes | Granted for Project |
| User.ReadWrite.All | Read and write all users' full profiles | Yes | Granted for Project |
| Mail.ReadWrite | Read and write all users' full profiles | Yes | Granted for Project |
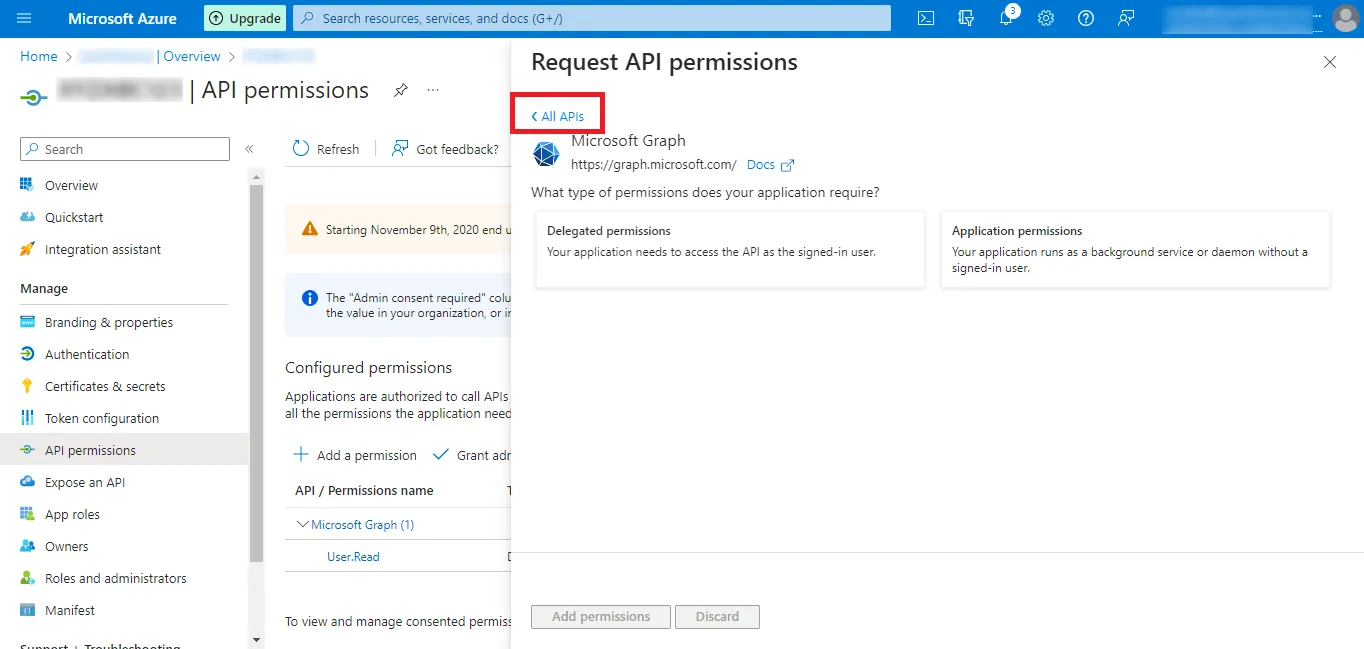
Step 21: Then Click on All APIs and go to the
previous step for more permissions.
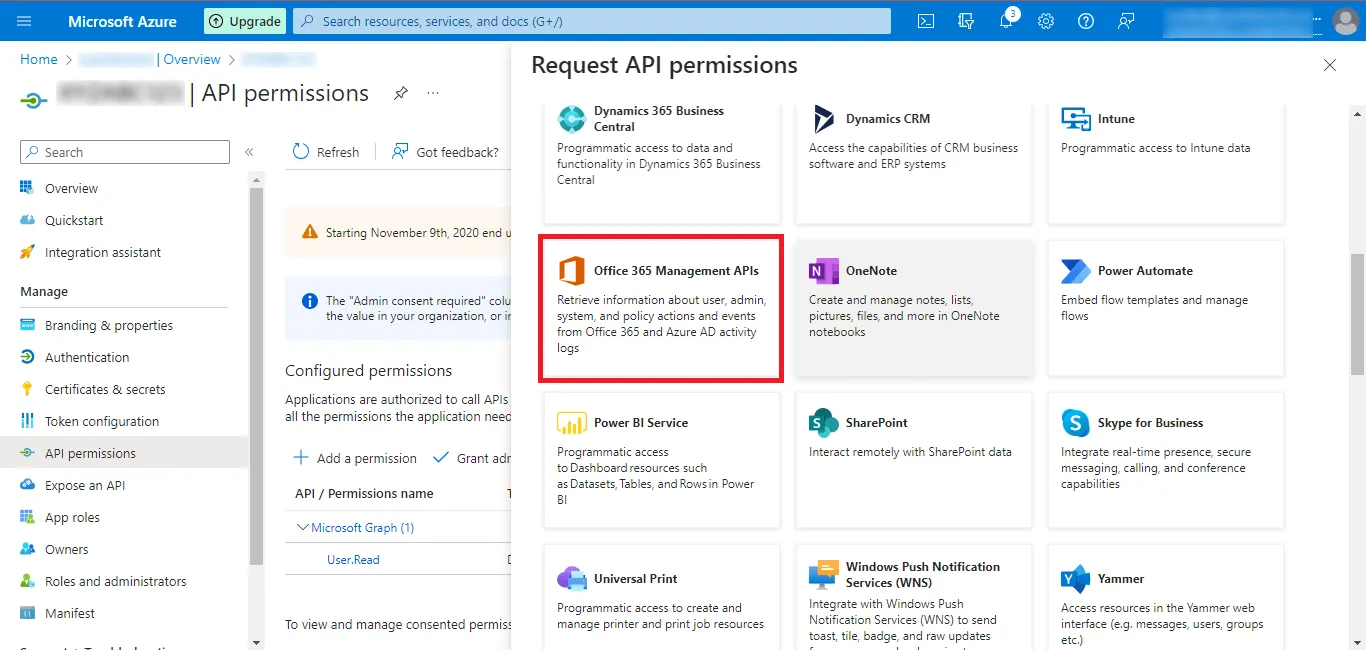
Step 22: Now click on the Office 365 Management APIs option.
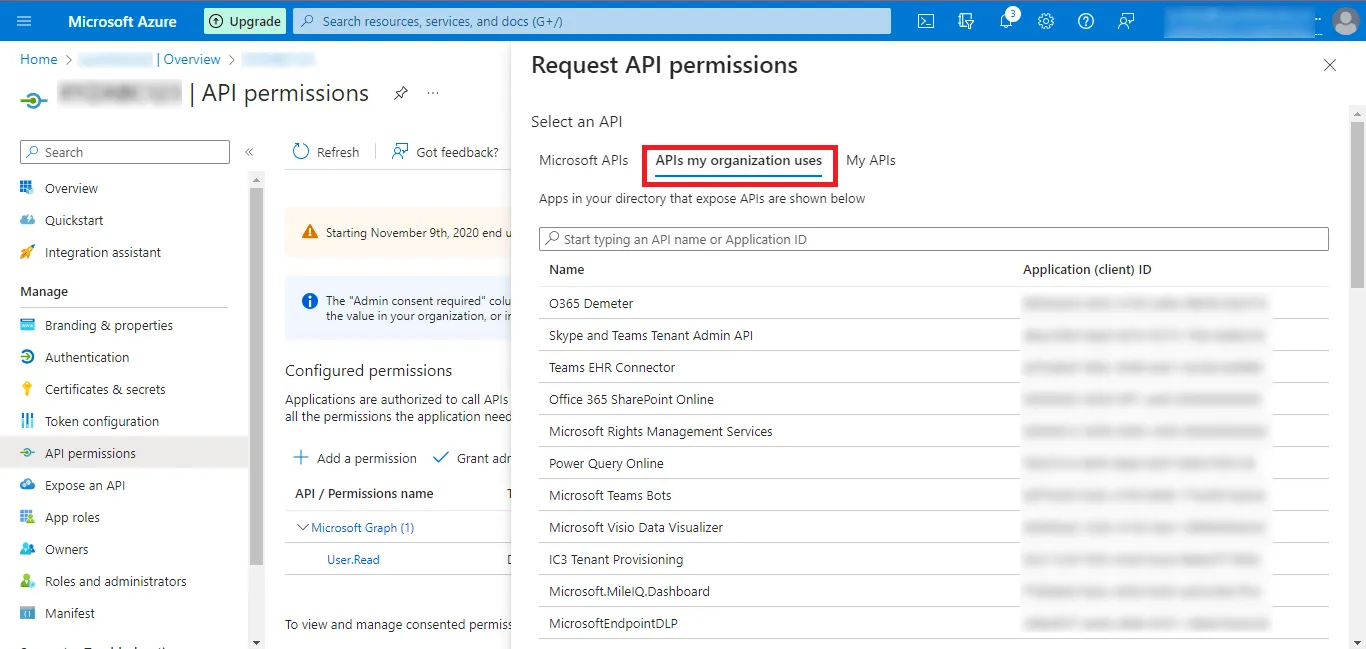
Step 23: Then move to the APIs my organization uses tab.
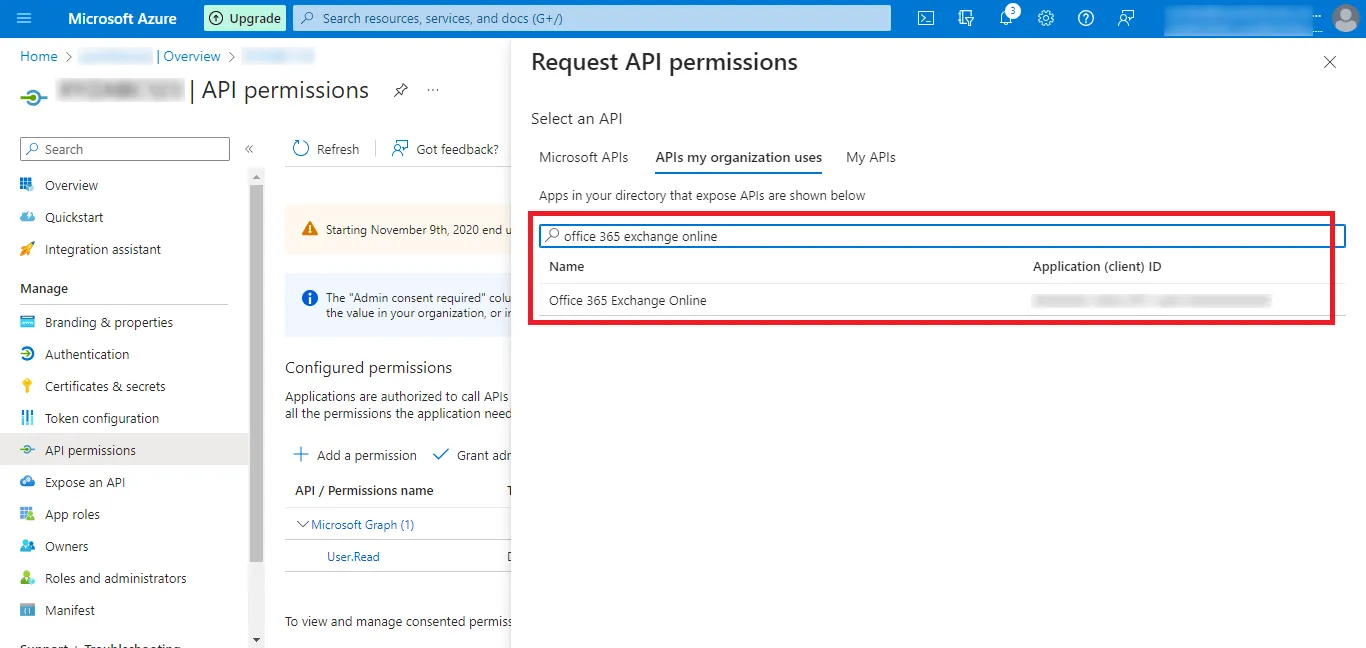
Step 24: Search for the Office 365 Exchange Online option and
click on the search result that
appears.
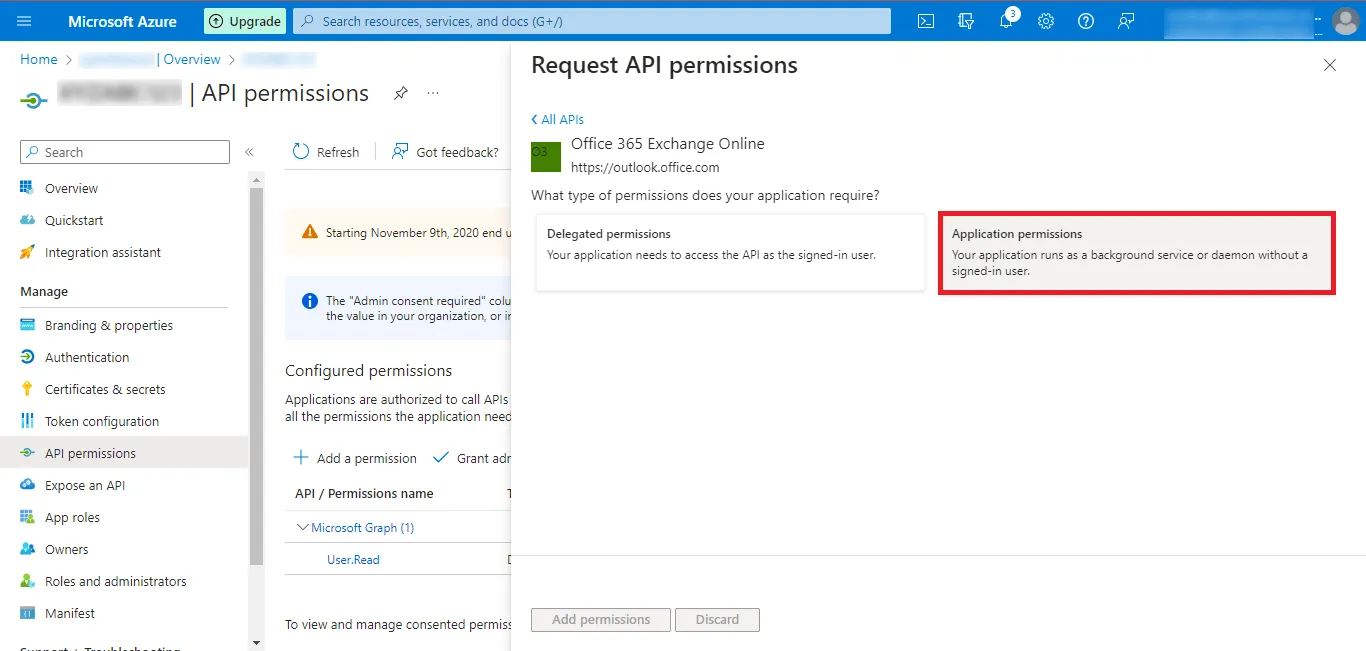
Step 25: Now Click on the Application permissions option.
| API/Permissions Name | Description | Admin consent required | Status |
|---|---|---|---|
| full_access_as_app | Use Exchange Web Services with Full Access to All Mailboxes | Yes | Granted for Project |
| Mail.ReadWrite | Read and write mail in all mailboxes | Yes | Granted for Project |
| Tasks.ReadWrite | Read and write tasks in all mailboxes | Yes | Granted for Project |
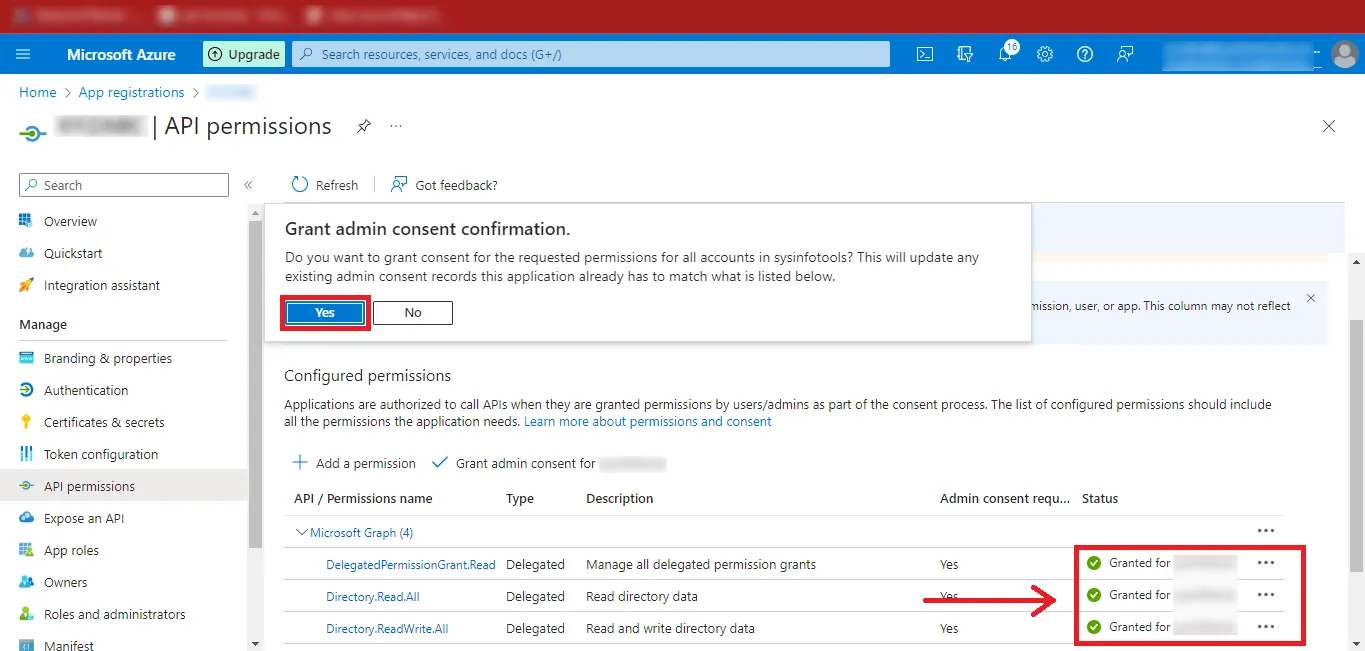
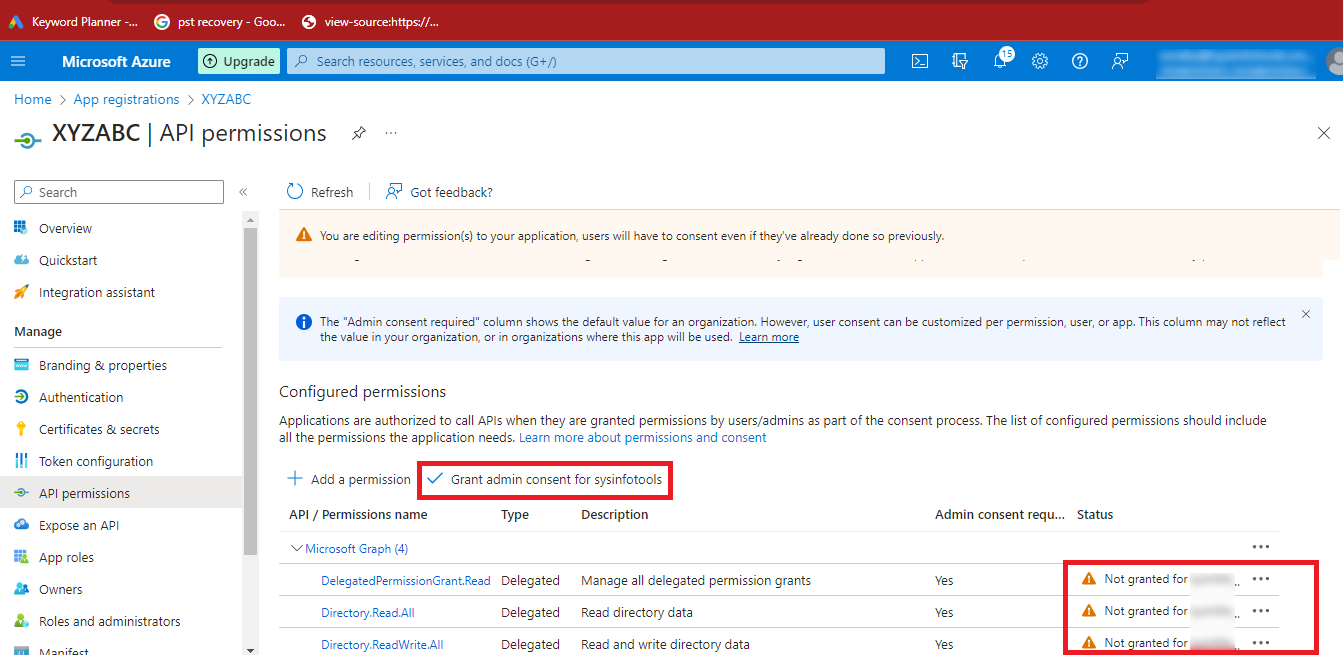
Step 26: After Adding the Permissions, you can see that the
Status is Not Granted. So, click on the Grant admin
consent for “YourAccount” option.

Step 27: Click on Yes and the Status will
change to Granted.
Step 28: Finally, you have created Azure Active Directory Application and Enabled Necessary API Permissions.
Step 1: Open Google and Search for the Microsoft Azure Portal.
Step 2: Click on the First Result that appears in the Google
Search Results. You can Directly Click on https://azure.microsoft.com/en-us/get-started/azure-portal

Step 3: The MicrosoftAzure Portal will appear in front of you.
Click on the Sign In button at the Top-Right Corner of the Page.

Step 4: Now Enter your Microsoft Admin ID and click on the
Next button.
Step 5: Provide your Password and click on the Sign
In button.
Step 6: Then you will have to click on the User ID at the
top-right corner of the Page and click on the View Account Link.

Step 7: Copy your Admin ID and Paste it at a Safe
Location.
Step 8: Return back to the previous page and click on the Three
Bars at the Top-Left Corner of your Page.

Step 9: Then click on the Azure Active Directory option.
Step 10: Now the Azure Portal will appear on your screen.

Step 11: Click on the Add option and once it expands, click on the App
Registration Option.

Step 12: Now enter the desired name you want to give in the Name
Box and Mark the Third Option i.e. “Accounts in any
organizational directory (Any Azure AD directory - Multitenant) and personal Microsoft
account (e.g. Skype, Xbox)” option. Click on the Register Button
to Continue.
Step 13: Now you can see the Given Name, Application (client) ID, Directory
(tenant) ID, and other details. Copy the Application (client) ID and Directory (tenant) ID and
paste them at a safe place.
Step 14: Then click on the Certificates & Secrets option on the left side of the
page and click on the New client secret option.
Step 15: In the Description Box enter any name you want to
enter and click on the Add button.
Step 16: After the above step, your Secret Value will be created. Click on the
Copy Icon and paste the Secret Value at a Safe Place.

Step 17: Click on the API Permissions option and in the Configured
Permissions Section click on Add a Permission.

Step 18: Now Click on Microsoft Graph in the Request API
permissions Panel.

Step 19: Now you will have to give the Delegated Permissions and Application Permissions.
Step 20: Search the following Permissions as Given in the Table
below and Add them.

| API/Permissions Name | Description | Admin consent required | Status |
|---|---|---|---|
| DelegatedPermissionGrant.ReadWrite.All | Manage all delegated permission grants | Yes | Granted for Project |
| Directory.Read.All | Read directory data | Yes | Granted for Project |
| Directory.ReadWrite.All | Read and write directory data | Yes | Granted for Project |
| Files.Read | Read user files | No | Granted for Project |
| Files.Read.Selected | Read files that the user selects (preview) | No | Granted for Project |
| Files.Read.Write | Have full access to user files | No | Granted for Project |
| Files.ReadWrite.All | Have full access to all files user can access | No | Granted for Project |
| Files.ReadWrite.AppFolder | Have full access to the application's folder (preview) | No | Granted for Project |
| Files.ReadWrite.Selected | Read and write files that the user selects (preview) | No | Granted for Project |
| Group.ReadWrite.All | Read and write all groups | Yes | Granted for Project |
| Sites.Read.All | Read items in all site collections | No | Granted for Project |
| User.Export.All | Export user's data | Yes | Granted for Project |
| User.Manageldentities.All | Manage user identities | Yes | Granted for Project |
| User.Read | Sign in and read user profile | No | Granted for Project |
| User.Read.All | Read all users' full profiles | Yes | Granted for Project |
| User.ReadBasic.All | Read all users' basic profiles | No | Granted for Project |
| User.ReadWrite | Read and write access to user profile | No | Granted for Project |
| User.ReadWrite.All | Read and write all users' full profiles | Yes | Granted for Project |
| API/Permissions Name | Description | Admin consent required | Status |
|---|---|---|---|
| Files.ReadWrite.All | Read and Write files in all site collections | Yes | Granted for Project |
| User.Export.All | Application Export user's data | Yes | Granted for Project |
| User.Invite.All | Invite guest users to the organization | Yes | Granted for Project |
| User.Manageldentities.All | Manage all users' identities | Yes | Granted for Project |
| User.Read.All | Read all users' full profiles | Yes | Granted for Project |
| User.ReadWrite.All | Read and write all users' full profiles | Yes | Granted for Project |
| Mail.ReadWrite | Read and write all users' full profiles | Yes | Granted for Project |
Step 21: After Adding the Permissions, you can see that the
Status is Not Granted. So, click on the Grant admin
consent for “YourAccount” option.
Step 22: Click on Yes and the Status will
change to Granted.

Step 23: Finally, you have created Azure Active Directory Application and Enabled Necessary API Permissions.
Related Articles
How to Export Yahoo Mail to PST File Format? How to Migrate Yahoo Mail to Office 365 Account Easily? How to Change Yahoo Email Address? How to Setup Yahoo Mail in Outlook Email Client? How To Export Gmail Emails To PDF? How to Export Yahoo Emails to Computer? How to Save Gmail Emails with Attachments to the Hard Drive?