User Query: I have five MBOX containers holding close to 12 GB of project files. Native Gmail import tools timeout on files over 2 GB. What is the safest method to transfer MBOX files without corrupting headers or losing attachments?
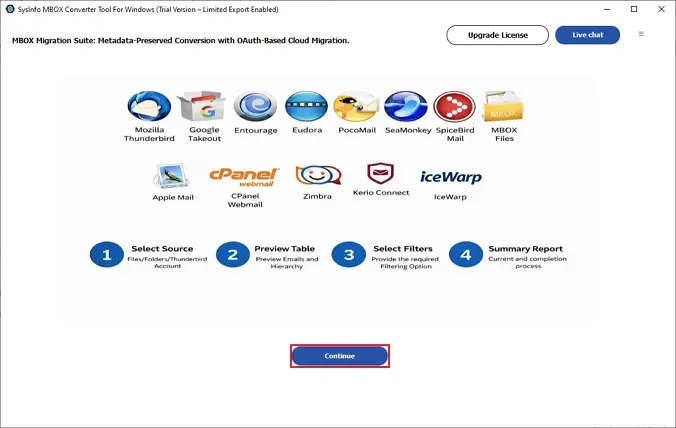
Fragmented mailboxes waste hours and complicate data recovery. Teams now consolidate everything into a single, organized inbox. Accuracy becomes critical when you transfer MBOX to Gmail, because manual extraction routinely misaligns headers and leaves attachments behind. This breakdown compares a straightforward client import method against a purpose-built MBOX Exporter for reliable migration without formatting loss.
Prepare your environment before attempting to open MBOX to Gmail.
Some users choose the manual approach to avoid spending money. With the help of an email client, MBOX files can be moved to Gmail, but it’s a time-consuming method, especially for larger amounts of data.
Steps to Help You With Migration:
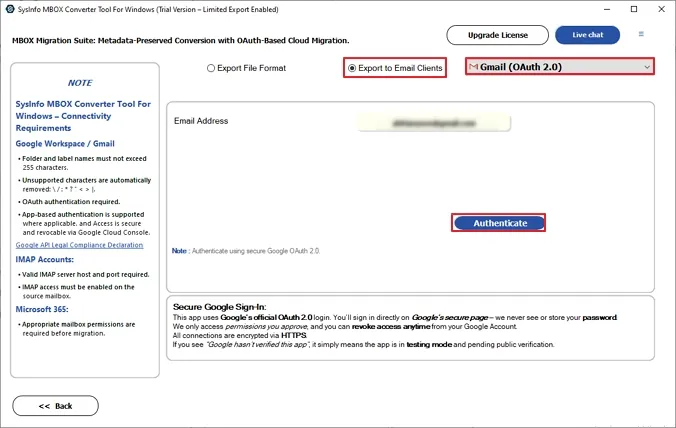
On the other hand, the Gmail Interface also lets you directly transfer MBOX to Gmail.
Limitations of Manual Methods
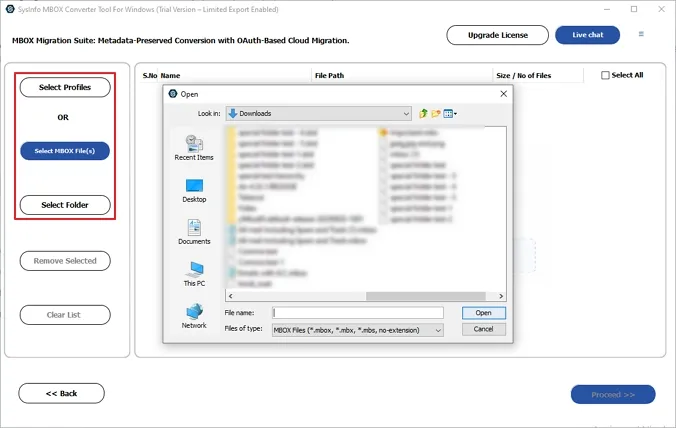
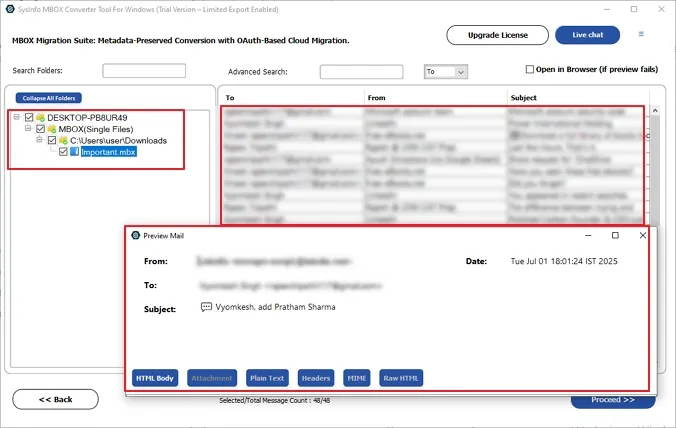
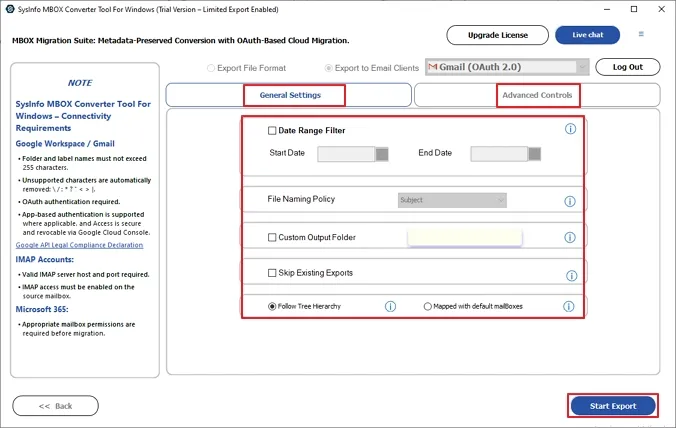
When your inbox gets too big, manual methods fail to deliver. That’s where an automated tool comes in play and enables you to handle multiple large files efficiently. SysInfo MBOX Exporter allows you to upload MBOX file to Gmail in bulk without any data loss. The tool also makes it easy to import MBOX to Office 365 without any extra steps.
Steps:
A small marketing firm needed to move nearly 500 GB of MBOX data from local systems to Google Workspace. Manual methods were not practical. They used SysInfo MBOX Exporter to upload their MBOX files. The software ensured a smooth process and preserved important email information. The team could access their data in Gmail within a week with the help of this amazing utility. Later, they were able to import MBOX to iCloud for another purpose with this tool.
Handling large MBOX files often becomes messy, especially when emails, attachments, and folders must stay intact. You must pick the right approach to transfer MBOX to Gmail while ensuring data integrity. Manual methods may work for small tasks, but they take time, need technical effort, and can easily lead to missing data. With SysInfo MBOX Exporter, you get a faster, safer way to move everything at once while keeping your data complete and organized.
Q1. How can I transfer MBOX to Gmail without losing emails?
Ans- You can use the SysInfo MBOX Exporter Tool to securely transfer MBOX files. This tool preserves emails, attachments, and structure while ensuring no data is lost.
Q2. Will folder hierarchy be maintained when transferring MBOX to Gmail?
Ans- Yes, the SysInfo MBOX Exporter Software keeps the original folder structure intact during migration. It ensures emails remain properly organized in Gmail just like in the source MBOX files.
Q3. Can I upload multiple MBOX files to Gmail at once?
Ans- Yes, Sysinfo MBOX Migrator supports bulk migration. You can upload multiple MBOX files in a single process, saving time and effort when handling large or multiple mailbox files.
Q4. How can I filter emails before uploading MBOX to Gmail?
Ans- With the SysInfo MBOX Exporter Tool, you can apply filters like date range or exclude duplicates. This helps you transfer only the required emails instead of the entire mailbox data.
Q5. Does Gmail have any limitations when importing MBOX data?
Ans- Gmail does not directly support MBOX import and has storage and IMAP limitations. Using SysInfo MBOX Exporter Software helps bypass these restrictions and ensures smooth, uninterrupted migration.
Related Articles
How to Export Yahoo Mail to PST File Format? How to Migrate Yahoo Mail to Office 365 Account Easily? How to Change Yahoo Email Address? How to Setup Yahoo Mail in Outlook Email Client? How To Export Gmail Emails To PDF? How to Export Yahoo Emails to Computer? How to Save Gmail Emails with Attachments to the Hard Drive?